


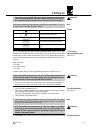

4 Operating Notes
4.3 Muting the Microphone
Refer to fig. 1.
4.3.1 Optional
Remote Mute Switch
Refer to fig. 4.
4.4 Replacing Batteries
4.5 Microphone Technique
4.5.1 C 417 L, CK 55 L
Lavalier Microphones
4.5.2 4.2 C 520 L, C 555 L
Head-worn Microphones
4.6 Multichannel Systems
4.7 Battery Care
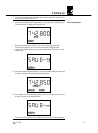
• To toggle between LOCK or ACTIVE mode and SILENT mode:
1. Switch power to the transmitter OFF.
2. Hold down the ON/OFF switch for approx. 0.6 seconds to enter LOCK mode OR hold
down the setup switch for approx. two seconds to enter SILENT mode.
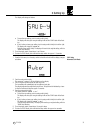
1. To mute the microphone, slide the MUTE switch (4) to the "MUTE" position. The status
LED (1) will change to red.
2. To switch the microphone back ON, slide the MUTE switch (4) to the "ON" position. The
status LED (1) will change to green.
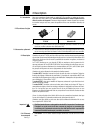
The optional Remote Mute Switch allows you to mute the transmitter if it is mounted in a po-
sition where it is difficult or impossible to use the "on-board" MUTE switch.
1. Plug the cable (1) on the Remote Mute Switch into the REMOTE MUTE jack (2) on the
transmitter.
2. Put the Remote Mute Switch in a jacket or shirt pocket or use the belt clip to clamp the
Remote Mute Switch on the belt.
3. To mute the microphone, press the button on the Remote Mute Switch. The button will
lock and the status LED will change to red.
4. To switch the microphone back on, press the button again. The status LED will change
to green.
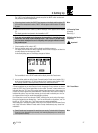
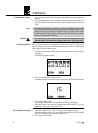
In LOCK mode, the display constantly indicates the current battery capacity as a string of bars
below the frequency readout.
If the "BATT" label starts flashing, a dash appears instead of the bars, and the status LED
changes to red, replace the batteries or charge the AKG BP 4000 battery pack as soon as
possible.
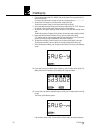
You can check the remaining battery capacity at any time by turning the setup switch briefly
to the left or right one to three times (depending on the currently active screen). The battery
capacity will be displayed in hours and as a string of bars.
1. Fix the microphone to the H 40/1 lavalier clip or H 41/1 tie pin referring to the micro-
phone’s instruction manual.
2. Clamp the microphone on your cloth ing as close as possible to your mouth.
Remember that gain-before-feed back will be the higher the smaller the distance be-
tween the microphone and the mouth!
3. Make sure to aim the microphone at your mouth.
• Refer to the user’s manual of the respective microphone for instructions on how to use
head-worn microphones.
• If reception on the selected carrier frequency is poor, use Automatic Frequency Selec-
tion (“FREQ -> CHANNEL -> AUTO”) on the receiver to find the nearest clean Channel
within the selected Frequency Group.
• Should you find no clean Channel, useAutomatic Frequency Selection (“FREQ -> GROUP
-> AUTO”) on the receiver to select a different Frequency Group within the same Pre-
set and selecet a new frequency for each transmiter and receiver.
1. If you know you won’t be using the transmitter fo more than a week, remove the bat-
teries or BP 4000 battery pack from the transmitter.
2. Make it a habit to charge the BP 4000 battery pack fully every time you used the trans-
mitter for at least one or two hours. This is a good way to prevent the battery pack from
dying in the middle of the next gig.
3. Always charge the BP 4000 battery pack fully before storing it outside the transmitter.
This will maintain the battery pack’s capacity at a higher level for a longer time.
33
PT 4500