8
Advanced Functions
Adjusting Utility Settings
The Utility settings let you further customize your pad settings and adjust the module's MIDI settings.
To adjust the Utility settings:
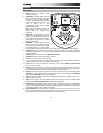
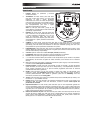
1. Hit the pad whose settings you want to adjust, or press its corresponding Pad Select button.
2. Press Utility, then press Page/Select until the desired setting appears in the display:
• SEN (Pad sensitivity): Controls how responsive a pad is when you hit it. The higher the value, the less
forcefully you need to play to generate a loud hit.
• THR (Pad threshold): Controls how forcefully you have to hit the pad to generate a sound. The higher the
value, the harder you have to hit it.
• CRO (Pad crosstalk): Crosstalk is the unintentional triggering of a pad when an adjacent pad is hit. The
higher the value, the less likely the pad will be triggered by crosstalk.
• CUR (Pad velocity curve): Controls the pad's dynamic response relative to the force (velocity) of your hit.
The curves are shown in the Appendix.
• R-S (Pad rim sensitivity): Controls how responsive a pad's rim is when you hit it.
• S-S (Hi-Hat "splash" sensitivity): Controls how responsive the hi-hat "splash" effect is when you hit the
pedal. (To create this sound, tap your foot on the pedal but lift it up immediately instead of leaving your
foot down.)
• LOC (Local Mode): See MIDI Settings for more information.
• GM (General MIDI Mode): See MIDI Settings for more information.
3. Use the < and > buttons to adjust the value.
To save the settings, press Save. Otherwise, they will return to their default settings when you power the module
off.
Adjusting the Metronome
The module's built-in metronome can be used when practicing, performing, recording, or playback.
Using the metronome:
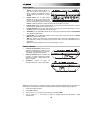
You can turn the metronome ("click track") on or off by pressing the Click button. Adjust its tempo by pressing
Tempo and using the < and > buttons to set the new BPM (beats per minute).
To adjust the metronome settings:
1. Turn on the metronome (by pressing Click), then press Page/Select until the desired setting appears in the
display:
• SIG (Time signature): The time signature the metronome is counting. (When a "0" is selected as the first
number, the first beat will not be indicated by a different metronome sound; every beat will have the
same sound.)
• INT (Interval): The subdivisions that the metronome will play.
• VOL (Volume): The metronome volume.
• VOC (Voice): The metronome sound.
2. Use the < and > buttons to adjust the value. The settings will be automatically saved.
Recording
To record:
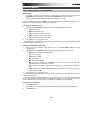
1. If the LED above the Song/Pattern button is not lit, press and hold Page/Select until it is.
2. Press Record. The button's LED will flash and the metronome will turn on automatically. This means the
module is record-armed.
3. To start recording, press Start/Stop, or hit any pad. The Record LED will light solid. (To cancel recording
instead, press Record again.)
4. To stop recording, press Start/Stop, or press Record. The Record LED will turn off.
5. To play the recording, press Play/Practice. Press it again to stop playback.
Notes:
• In Learning Mode, your performances are automatically recorded.
• If FUL appears on the display, it means the module's memory became full while recording. You can
clear/overwrite the memory by simply making a new recording.


