


9
To record your performance with a Song:
1. Adjust the Song number (SNG) (as described in the To adjust the recording settings section below).
2. Start recording (as described in the To record section above).
3. To play the recording, press Play/Practice. Press it again to stop playback.
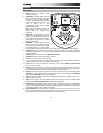
To adjust the recording settings:
1. If the LED above the Song/Pattern button is not lit, press and hold Page/Select until it is.
2. Press Record. The button's LED will flash and the metronome will turn on automatically. This means
3. the module is record-armed.
4. Press Page/Select until the desired setting appears in the display:
• SNG (Song number): The song that will play in the background.
• KIT (Kit): The drum kit that will be recorded.
• BPM (Tempo): The recording tempo.
• SIG (Time signature): The recording time signature.
• INT (Interval): The subdivisions that the metronome will play.
• DRM (Drum off): When not set to a song (---) or when set to Song 61-80, this setting is disabled because
an actual song is not selected (Songs 61-80 are actually just samples that can be assigned to the pads).
When set to Song 1-60, you can set this to ON or OFF to turn the original drum part on or off.
Alternatively, you can press the Drum Off button.
• PRC (Pre-count): When set to ON, there will be a one-measure count-in before the recording starts.
When set to OFF, the recording will start immediately after you press Start/Stop or hit a pad.
5. Use the < and > buttons to adjust the value. The settings will be automatically saved.
MIDI Settings
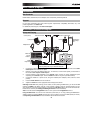
You can connect the drum module to an external MIDI module or device, allowing you to:
• use a connected electronic drum kit to trigger sounds in the external module
• use another MIDI device to trigger sounds in the drum module
To change the MIDI note number sent by each pad, see the To adjust the pad settings section under Editing and
Saving Drum Kits.
To adjust the MIDI settings:
1. Hit the pad whose settings you want to adjust, or press its corresponding Pad Select button.
2. Press Utility, then press Page/Select until the desired setting appears in the display:
• LOC (Local Mode):
o When set to ON, playing your electronic drum kit will trigger the sounds in the drum module.
o When set to OFF, playing your electronic drum kit will trigger sounds in a sound module connected
to the module's MIDI Out, bypassing the drum module's sound library.
• GM (General MIDI Mode): See Accessing the module's programs below for more information.
o When set to ON, Channel 10 in the drum module will use General MIDI percussion sounds.
o When set to OFF, Channel 10 in the drum module will use the module's internal drum sounds.
3. Use the < and > buttons to adjust the value.
Accessing the module's programs: You can use an external MIDI device (e.g., a MIDI keyboard or sequencer) to
access the drum module's other sound libraries ("programs"), such as piano, bass, strings, etc. Select a different
program by sending a Program Change message from your external device. Each program uses a dedicated MIDI
channel (1-16). Channel 10 is reserved for the drum sounds.
To record to an external sequencer:
1. Use a standard MIDI cable (sold separately) to connect the drum module's MIDI Out to your sequencer's MIDI
In. Use another MIDI cable to connect the sequencer's MIDI Out to your module's MIDI In.
2. Set the active track of your sequencer to Channel 10, and start recording.
3. Play your electronic drum kit!
4. Stop recording on your sequencer. Your performance has been recorded.
Notes:
• Pressing Start/
Stop to start/stop Song playback generates the MIDI message FA (start) or FC (stop).
• When syncing the module with another MIDI device, the DM7X module can only be the master, not the
slave.