3
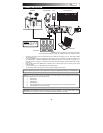
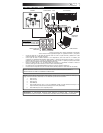
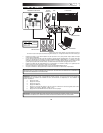
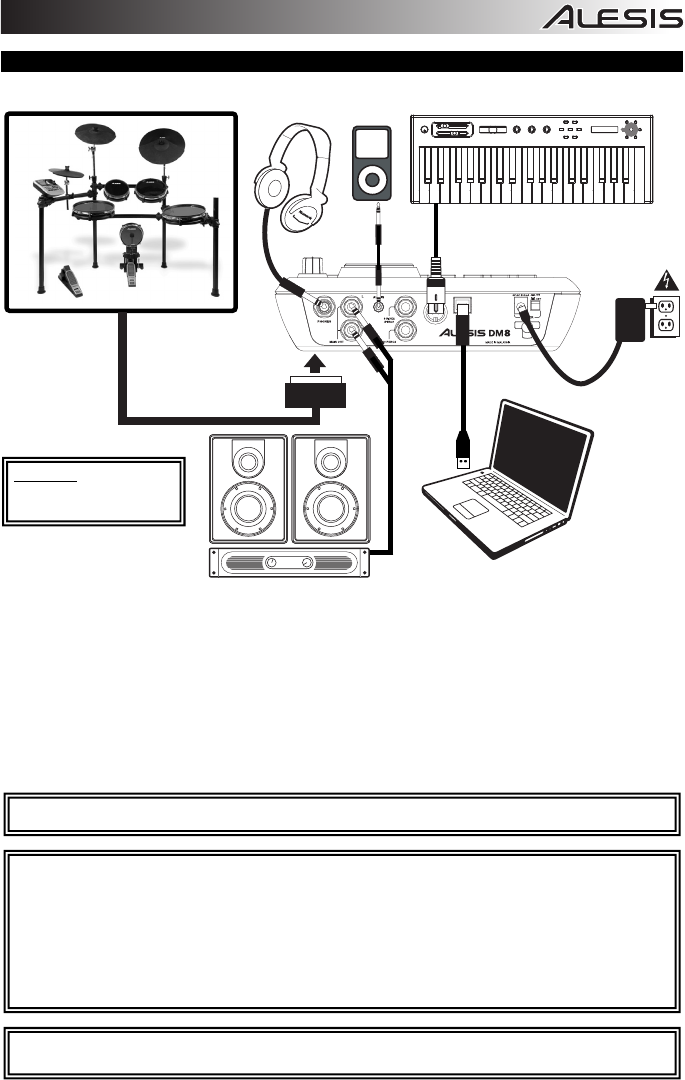
CONNECTION DIAGRAM
volume
m1
m2
pitch
xyz
-
+
octave
accomp
store
tap
phrase
latch
analog modeling synth
push
r
h
y
t
h
m
s
p
a
t
t
e
r
n
s
p
r
o
g
r
a
m
s
s
e
t
u
p
s
c
o
n
f
i
g
Headphones, iPod*, keyboard, amp, and computer not included.
* iTunes and iPod are trademarks of Apple, Inc., registered in the U.S.A. and other countries.
• Connect the 1/4" cables of your kit's cable snake to the drum pads and cymbal pads of your kit. Each cable is labeled
with its proper trigger.
• If you have additional drum pads, cymbal pads, or other triggers, you can use standard 1/4" cables to connect them to
the "RIDE 2/PERC1" or "PERC2" TRIGGER INPUTS on the module's rear panel. Dual-zone pads or cymbals (e.g., a
drum with head and rim triggers or a cymbal that can produce bow and bell sounds) will require TRS cables to trigger
both zones.
• Plug 1/4” TRS cables from the MAIN OUT to an amplifier, mixer, or speaker system. (For mono sound, connect a cable
to the Left output.)
• You can connect a set of 1/4” TRS headphones to the PHONES output.
• You can connect another audio device to the AUX IN using a standard 1/8" stereo cable.
IMPORTANT: THE DM8 MODULE MAY BE AFFECTED BY STATIC ELECTRICITY. IF THIS OCCURS, SIMPLY TURN
THE MODULE OFF AND WAIT AT LEAST A FEW SECONDS BEFORE TURNING IT ON AGAIN.
NOTE: Out of the box, the DM8 module is write-protected, so you will be unable to save any changes you make to the Kits,
Instruments, Sequences, etc. To turn write protection off:
1. Press UTILITY.
2. Press SYS (F4).
3. Press O/S (F3).
4. Press MEM (F4).
5. Press VALUE DOWN or move the VALUE DIAL counterclockwise until the "WriteProt" field says "OFF."
6. Press DRUM KIT to return to the main page.
See the included assembly poster for further instructions on setting up the DM
8
Kit and connecting it to the DM
8
modul
e
.
POWER
COMPUTER
HOUSE AMP
DRUM KIT
MIDI KEYBOARD
WARNI
N
G
:
Use only the
included Alesis power supply
with the DM8 module.
HEADPHONES iPod*


