


6
Plug-and-Play Connection to a Computer
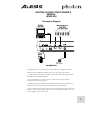
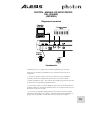
Both Windows XP and Mac OS X see the Photon as a plug-and play MIDI
controller. Simply plug the Photon into your computer using a USB cable and
allow the operating system to install it automatically.
Depending on your operating system, the Photon 25 may be identified by your
MIDI software applications as either a "Photon" controller or a "USB Audio
Device." No need to worry: the Photon will work regardless of its designation.
The Photon is not compatible with earlier versions of Windows or Mac OS.
Operation:
1. Using the Keyboard with your MIDI software
Once you're plugged in and powered up, go to your sound module or software
application and set the incoming MIDI channel.
If you're using software, you will probably need to configure it to use the Photon
or "USB" device. Look for the MIDI device setup menu in your application and
ensure that the Photon is designated as an active MIDI device before proceeding.
On the Photon, press MIDI CHANNEL and turn the clear encoder knob to
select the MIDI channel you specified in your sound module or software.
Play the keyboard. Your sound module or software should respond to the Photon
25's MIDI data. If not, refer to the troubleshooting instructions later in this guide.
Experiment with the Photon 25's OCTAVE buttons and X/Y joystick. Since the
joystick is mapped by default to MIDI's standard pitch and modulation
commands, it should work as expected in most cases right off the bat.
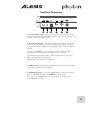
2. Using the Knobs with the Supplied
Controller Templates
If one of the supplied template sets matches your MIDI software, lift the plastic
template covers with your fingernail, position the templates, and then replace the
covers.
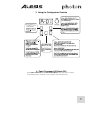
Press the PRESET button and turn the clear cursor knob to
reach the program number indicated on the templates.
Press the cursor knob to enter this program. You
should now be able to control the software according to
the templates.
Press the LAYER button as needed to cycle through
the three knob layers. Each layer is independent (though a
knob can be assigned to the same controller value on two or
three of the layers).
The lights on the top and
bottom rows are simply
duplicates of one another.
It's not possible to have, say,
Layer 1 on the top row and
Layer 2 on the bottom row.