


This is an effect used heavily by scratchers and performer DJ's. The mixer simulates this effect when you
hold down the X and Y fader buttons. The speed of the transform is preset and will only effect any channel
assigned to the fader assign button being depressed.
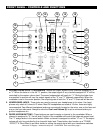
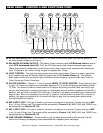
4. CHANNEL FADER - These faders are used to control the output signal of any source assigned to its
particular channel.
5. SPLIT CUE - This button will activate the "Split Cue" function. When used with a set of stereo head-
phones, the Split Cue function assign the Cue signal the left channel of the headphones and assigns the
Program (main output) signal to the right channel of the headphones. Essentially splitting the cue signal
in half. Please note that this function will only work with a set of stereo headphones.
6. CUE LEVEL VOLUME CONTROL - This knob is used to adjusts the headphone output level.
7. CUE MIXING CONTROL - This functions allows you to monitor the Cue level as well as the Program
(main output) level in your headphones. A channels Cue Level may only be monitored if the channels
Cue function is selected. To selceted a channels cue function depress the Cue Button (22) that is directly
associated with the specific channel you wish to monitor. You may use the mixing function to blend
both the Cue level and the Program level together. You can vary the output level to either hear more
or less of either of the two levels. Turning the Cue Mixing knob to the CUE position (counter-clockwise)
will allow you to hear more of the Cue level. Turning the knob to the PGM (clockwise) position will allow
you to hear more of the Program level (main output). You may also use the Cue Mixing Control to hear
either the Cue level or the Program level exclusively. If the knob is in the full CUE position you will only
hear the cue level, if the knob is in the full PGM position you will only hear the main output. This function
will esspecially be useful for occasions when an external monitor is not available.
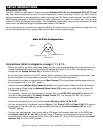
8. CROSSFADER CURVE ADJUSTMENT - This adjustment allows you to adjust the geometry or "shape"
of the crossfader response curve. The response curve can be adjusted from smooth to harsh (Instant).
The smooth adjustment - full counter clockwise - allows for a long running crossfade. This adjustment
will usually be used for normal DJing. The harsh adjustment - full clockwise adjustment - allows for a
short crossfade. This adjustment will usually be used for scratching and cut effects.
9. TALKOVER BUTTON - When this button is depressed, all signals except the microphone level are
decreased by 15dB. A red indicator LED will glow when the talkover function is engaged. In the OFF
position all signals remain at their standard levels.
10. MIC 3 INPUT JACK - Combination Microphone Plug. This jack will accept a standard 1/4 plug or XLR
3-pin balanced male plug. The volume output level will be controlled by the Channel 3 Fader (4).
11. CHANNEL GAIN CONTROL - This adjustment is used to adjust an audio source signal input gain for a
channel. Never use the gain control to adjust output volume. Setting the gain level properly will ensure a
clean output signal. To properly set the gain level controls:
1. Be sure the Master Volume Control (16) is set to minimum (zero output).
2. Set the Channel Fader (4) to level 7.
3. Begin play on an audio source connected to the channel you are adjusting.
4. Be sure the LED Level Indicator Function Switch (15) is set to the PFL/MASTER position.
5. Turn the CUE (22) function on for the channel you are adjusting.
6. Use the GAIN Control to adjust an average output volume of +4 dB in the LED Level Indicator (14).
12. CUT BUTTONS - These buttons are used cut out the Treble, Mid or Bass frequencies of the incoming
audio signal. When these buttons are depressed the selected frequency level is cut by 100%. When a
Cut Button is depressed a LED located directly above the specific button will glow indicating the
cut function has been activated. Depressing the Cut Button once again will disengage Cut function.
13. CHANNEL EQUALIZER "ROTARY KILLS" - BASS/MID/TREBLE CONTROL - Each of the three
channels come with a signal output EQ. These controls are used to increase or decrease the LOW's,
MID’s, and HI’s of the output signal. The Q-MX2 features "Rotary Kills" with a -30dB to +20dB gain control.
©American DJ Supply® - www.americandj.com - Q-MX2 BPM User Instructions page 5
FRONT PANEL - CONTROLS AND FUNCTIONS CONT.