


Turn the knob counter-clockwise to decrease a value or clockwise to increase a value.
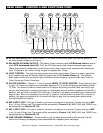
14. LED LEVEL INDICATORS - The dual LED's indicators along the top of unit are used to detail
either the master output level or a combination of the master output level and the cue PFL level. The
position of the LED Level Indicator Function Switch (15) will determine the LED Level Indicator's display
mode. In the "MASTER" (down) position the meter will detail the out level of the left and right channels.
In the "PFL/ MASTER" (up) position one side of the meter will detail the master output volume level and
the other section of the meter will detail the CUE level PFL (pre fader level).
Please Note: PFL stands for Pre Fader Level. This is the input channel signal level you will
hear in your headphones.
15. POWER SWITCH - This is the main power ON/OFF button. A yellow LED above the power switch will glow
to indicating power is ON. Be fore you turn the power on be sure you have made all connections to the
mixer. Also be sure you amplifier are tuned off. Remember mixer on first and turned off last.
16. LED LEVEL INDICATOR FUNC TION SWITCH - The position of the LED Level Indicator Function
Switch (15) will determine the LED Level Indicator's display mode. In the "MASTER" (down) position the
meter will detail the out level of the left and right channels. In the "PFL/ MASTER" (up) position one
side of the meter will detail the master output volume level and the other section of the meter will detail
the CUE level PFL (pre fader level).
17. MASTER VOLUM E CONTROL - This rotary knob is used to control the master output level (volume). To
avoid distorted output try to maintain an average output signal level +4 dB.
18. MASTER VOLUM E BALANCE CONTROL - This rotary knob is used to control the master output balance
level. Turning the knob to the "L" (counter-clockwise) position will increase the left channel output level.
Turing the knob to "R" (clockwise) position will increase the right channel output level, while decreasing the
left. To maintain a true stereo sound, level the balance control knob set to the 12 O'clock, or center
position.
19. BOOTH LEVEL VOLUM E CONTROL - This rotary knob is used to control the booth level volume. The
booth level is not PFL, it is essentially a second master output volume with separate output volume control.
20. ON/OFF Q START- This function works in conjunction with a compatible American DJ "Q" Start CD
player. When used with a compatible CD player, you can use the crossfader to start and stop the CD
Player with the slide of the fader. The ON/OFF “Q” START switch activates this FADER “Q” START feature.
When in the ON position, the FADER “Q” START allows the fader to return automatically to preset digital
CUE POINTS on your compatible American DJ CD Player.
For example, each time you slide the crossfader to far left the CD Player will be triggered to play the
song from the beginning of the preset CUE POINT. Refer to your American DJ CD Player User Manual
for setting CUE POINTS. Turn the ON/OFF SWITCH to the OFF position to disengaged “Q” Start
function and resume to a normal fader.
21. SOURCE SELECTOR SWITCH - These are 3-position switches. The switches are used to select the input
source assigned to each channel. Each channel may only be assigned one input source at a time.
22. CUE BUTTONS - These buttons are used to activates a channels "CUE" mode. A red LED above the
cue button will glow when cue mode is activated. Cue mode will send a channels incoming signal to
the headphones. The cue level is adjusted by the Cue Level Adjustment knob (6). Be sure the cue level
is set to minimum before putting your headphones on. Be sure to turn the Cue Mixing Knob (7) to the cue
position to hear the selected channel source.
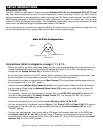
23. AUTOMATIC BPM (Beat Per a Minute) COUNTER BUTTONS - This sophisticated counter automatically
calculates the BPM of any audio source. The meter on the "X" side will display the avaerage BPM's of any
Channel (1, 2, or 3) assigned to "X" by the Fader Assign Buttons (3). The meter on the "Y" side will
display the avaerage BPM's of any Channel (1, 2, or 3) assigned to "Y" by the Fader Assign Buttons (3).
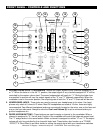
FRONT PANEL - CONTROLS AND FUNCTIONS CONT.
©American DJ Supply® - www.americandj.com - Q-MX2 BPM User Instructions page 6