


Heritage B-15 Bass Amplifier
Heritage B-15 Bass Amplifier Heritage B-15 Bass Amplifier
5
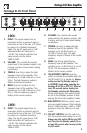
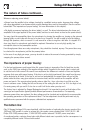
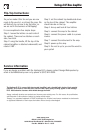
Heritage B-15 Front Panel
1964:
1. INPUT: The signal output from an
instrument (active or passive) may be
connected to one of the two 1/4” inputs
by means of a shielded instrument
cable. The top #1 input jack is 0 dB
while the bottom #2 input jack is
–15dB.Thischannelreplicatesthe
same circuitry as the classic
1964 B-15NC.
2. VOLUME: This controls the overall
output level to the speaker outputs. Use
it wisely, and turn it down when making
connections.
3. TREBLE: Use this to adjust the high
frequency level of the amplifier. This
provides up to 18 dB of boost or cut at
5 kHz. The high frequency output is
flattest at the center position.
4. BASS: Use this to adjust the low
frequency level of the amplifier. This
provides up to 10 dB of boost or cut at
40 Hz. The low frequency output is
flattest at the center position.
1966:
5. INPUT: The signal output from an
instrument (active or passive) may be
connected to one of the two 1/4” inputs
by means of a shielded instrument
cable. The top #1 input jack is 0 dB
while the bottom #2 input jack is
–15dB.Thischannelreplicatesthe
same circuitry as the classic
1966 B-15NF.
6. VOLUME: This controls the overall
output level to the speaker outputs. Use
it wisely, and turn it down when making
connections.
7. TREBLE: Use this to adjust the high
frequency level of the amplifier. This
provides up to 18 dB of boost, or
–30dBofcutat5kHz.Thehigh
frequency output is flattest at the center
position.
8. BASS: Use this to adjust the low
frequency level of the amplifier. This
provides up to 11 dB of boost or cut at
40 Hz. The low frequency output is
flattest at the center position.
9. ON/STANDBY SWITCH: Use this
switch to activate the amplifier after the
On/Off switch [11] is turned on.
Always
make sure the On/Standby switch is
in STANDBY mode when powering the
Heritage B-15 ON or OFF [11]. Allow at
least 30 seconds before turning the
On/Standby switch to the ON position.
During short breaks this switch should
be set to the Standby position to help
prolong the life of the amplifier’s tubes.
10. BIAS SWITCH: With this switch, users
may now select between 1964 cathode
bias or 1966 fixed bias, 1964 or 1966
preamp or have the ability to mix and
match.
11. ON/OFF SWITCH: Use this switch to
turn the overall system power on or off.
Always turn this switch ON first and OFF
last! Turn the On/Standby switch [9] on
at least 30 seconds after turning on the
On/Off switch.
1 5 2 3 4 6 7 8 9 1110