


4
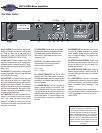
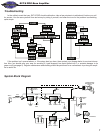
The Front Panel
SVT-8 PRO Bass Amplifier
INPUT
–12dB
MUTE
0 10
12345
PEAK
ULTRA HIGH
BRIGHT
GAIN
0 10 0 10
MIDRANGE
0 10
ON
TREBLE DRIVE POWER
POWER
MASTER
FA U LT
LIMIT
ON
POWER REDUCTION
PULL ON
BASSULTRA LOW
12345
FREQUENCY
1 3 4 9 10 12 16 1718 1913 14 155 6 112 87
1. INPUT: Connect your bass guitar here by
means of a shielded signal cable.
2. -12dB: This switch, when depressed, attenu-
ates the input signal by 12dB. Attenuation allows
the Gain control (#4) to be used over a larger por-
tion of its range. If clipping is indicated with the
Gain way down, attenuation is needed.
3. MUTE: This switch, when depressed, mutes all
outputs except the Tuner Out (#24, rear panel).
This allows you to use an electronic tuner without
having to adjust any levels or turn down your
house sound. A footswitch may be used to control
the mute function as long as this switch is in the
out position.
4. GAIN: This controls the gain of the preamp.
Adjust this control until the Peak LED (#5) flickers
on strong signal peaks (but is not illuminated con-
stantly while playing).
5. PEAK: This LED illuminates when the signal
level into the preamp or power amp nears clip-
ping. Adjust the Gain control (#4) until a strong
signal from your instrument causes this LED to
flicker with the Master control (#16) set low.
NOTE: If the LED flickers frequently with the Gain
at a low setting, use the -12dB switch (#2) to
attenuate the input signal and readjust the Gain.
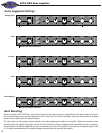
6. ULTRA LOW:Use this five-position rotary
switch to optimize the low end response as fol-
lows:
1: Off – flat low frequency response
2: Sub Cut – reduces frequencies below the
bass range to protect your speakers
3: Low Cut Classic – provides a low cut equal
to our original SVT Classic amplifier
4: Ultra Low Classic – contours the sound to
emphasize the low end just like our original
SVT amplifier
5: Ultra Low Modern – provides a substantial
low end boost
7. ULTRA HIGH: This switch, when depressed,
adds about a 16dB boost to the high frequencies
around 8kHz, depending on the setting of the
Gain control.
8. BRIGHT: This switch, when depressed, adds a
6dB boost to the high frequencies at 3kHz.
9. BASS: Use this control to adjust the low fre-
quency output level. This control provides +17/-13
dB at 20Hz.
10. MIDRANGE: Use this control to adjust the
midrange frequency output. This control provides
+/-20dB at the frequency selected by the adjacent
Frequency control (#11).
11. FREQUENCY: Use this control to select the
center frequency for the Midrange control (#10)
as follows:
1: 220Hz
2: 450Hz
3: 800Hz
4: 1.6kHz
5: 3kHz
12. TREBLE: Use this control to adjust the high
frequency output level. This control provides +18/
-20dB at 7kHz.
13. POWER REDUCTION ON: This LED illumi-
nates when the Power Reduction function is
active.
14. POWER REDUCTION DRIVE / PULL ON:
This control, when engaged, determines the sig-
nal level sent to the simulated tube power amp
section. This control works in conjuntion with the
other preamp controls in determining how hard
the “power amp” is driven. The Power Reduction
is engaged when this control is pulled out slightly
until it clicks.
15. POWER REDUCTION POWER: This control
sets the output level of the simulated tube power
amp section. This allows you to obtain the desired
amount of “tube power amp growl” at any volume.
16. MASTER: Use this control to adjust the over-
all level of the amplifier.
17. LIMIT: The SVT-8 PRO employs an internal
limiter to help prevent overdriving the power amp.
This LED illuminates when the Limiter is activat-
ed, indicating that the levels are near clipping.
Reduce the Master control (#16) if this LED illu-
minates continuously while playing.
18. FAULT: This LED illuminates when faulty con-
ditions cause the amplifier to protect itself against
damages. If this LED should illuminate while play-
ing, turn the amplifier off, wait ten seconds, then
turn the amplifier back on. If the Fault LED con-
tinues to illuminate refer the amplifier to a qualified
Ampeg service center.
19. POWER: Use this switch to turn the amplifier
on (top of the switch depressed) and off (bottom
of the switch depressed). The adjacent LED illu-
minates when the amplifier is turned on.