


Operator Manual – MX-406 Mixer Page - 7
All Rights Reserved
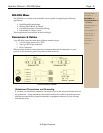
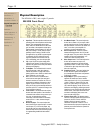
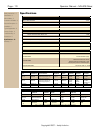
MX-406 Rear Panel
1. Microphone Input - The MX-406 microphone
input is an active balanced type with a nominal
impedance of 1200 ohms. Performance is best
with a 200 ohm microphone.
2. Input Pad - The input pad is a 20dB
attenuation switch on the rear panel for use
with the XLR microphone inputs. It should
normally be left in the "out" position for best
signal to noise ratio and should only be used
when the input is being overdriven with the gain
control at its minimum setting.
3. Line Input - The line input is a standard 1/4"
TRS active balanced type. The line input
balanced impedance is 20. It will
accommodate a wide range of input levels.
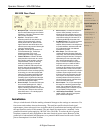
4. Channel TRS Insert - A channel TRS insert
patch point allows a device such as a remote
level controller, graphic equalizer, noise gate,
compressor/limiter, or direct out recording
device to be used with one or more input
channels. The MX-406 TRS insert jacks use
the tip for output and ring for the returning
input. These signals are unbalanced. To use
the TRS insert as a Direct Line Output (pre EQ)
for recording, you must make a special cable
with tip and ring connected at the MX-406 end
and a tip-sleeve mono plug at the other end.
Connecting tip and ring at the mixer insert jack
is necessary for uninterrupted signal within the
mixer when using direct line outputs.
5. Stereo Line Input - The stereo line RCA inputs
have a nominal operating level of -10dBu to
match most consumer audio sources. This
signal is controlled by the Stereo Line Input dial
on the front panel. This input is also used as a
stereo effects return, or as a stacking input for
adding additional mixers.
6. Stereo Line Out - The stereo line outputs are
nominal -10dBu "premaster", and are not
affected by the main Left/Right output controls.
These outputs would be used for making a pre-
output fader recording off of the stereo mix, or
for stacking the MX-406 with another mixer.
7. Aux Master Output - The 1/4" jack aux master
output is used to drive a monitor or zone
amplifier, effects processor or recording device.
It is pseudo-balanced, which means that while
it is a single ended signal, it has balanced
impedance for low noise.
8. Mono Output - The XLR mono output
combines the left and right stereo signals (pre
output fader), and uses an isolation transformer
capable of driving 600 ohm lines. This signal is
determined by the mono output level control,
with a nominal operating level of +4dBu.
Note: The transformer-balanced outputs are
designed to drive up to +24dBu into 600
loads. With output transformers, the level
increases as the impedance of the terminating
load exceeds 600 . Unlike a direct-coupled
output, transformers are affected by termination
impedance. Expect a slight increase in output
level when driving high impedance inputs with
these outputs. The output meters will remain
accurately calibrated to the levels present on
the transformerless outputs, regardless of the
load on the transformer outputs
9. Stereo Outputs - The 1/4" jack stereo right and
left outputs are controlled by the left and right
master. They are balanced TRS jacks with a
nominal operating level of +4dBu into any load,
and are capable of driving long lines.
10. +48V Phantom Power Switch - This switch
applies +48VDC to all six XLR mic inputs to
power condenser microphones.
Installation
Always switch the unit off before making substantial changes to the settings or connectors. Use
four screws and washers when rack mounting. This unit has specific electrical and signal
requirements, please take special care to double check all connections and settings and refer to
the specifications section of this manual. The unit should be connected to a standard 3-wire
grounded electrical outlet supplying 100-240 Volts, 50-60 Hz. To reduce the risk of ground
loop hum, connect all audio equipment to the same electrical power source. Removal of the
ground pin is both unlawful and dangerous, as a potential shock hazard could result. Overall
power consumption is less than 30 watts.
Safety Instructions – 3
Introduction - 4
MX-406 Mixer – 5
Connectors & Cables – 5
Physical Description - 6
Front Panel
Rear Panel
Installation – 7
Typical Applications - 8
Factory Configs - 8
Troubleshooting - 9
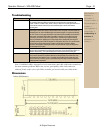
Dimensions - 9
Specifications - 10
Warranty - 11