


When the set gets dirty, wipe with a soft, dry cloth. If
the set is extremely dirty, soak a soft cloth in a 5 to 6%
solution of dishwashing detergent to water, wring it
tightly, wipe the dirt away, and finally wipe the set with
a dry cloth.
Never use alcohol, thinner, benzine, insecticide or other
volatile agents, as they may damage the surface paint
or gloss of the set.
Also do not wipe the set with a chemical cloth or leave
it on the set for a long period, as the surface finish may
be damaged or the paint may be stripped off.
Should problems occur, they are, in many cases, due to If the problem cannot be remedied after the following
simple operation mistakes or the like. On the basis of checks, please consult your dealer.
the following checks, you will be able to rectify a
number of problems yourself without difficulty.
The karaoke performance you enjoy may be disturbing noise to others.When performing karaoke,be sure to be
considerate of your neighbors.
The volume of karaoke is at your command. Remember that even small sounds transmit very well in the quiet night.
Be specially careful in karaoke performance at night.it is recommended to close the windows to avoid sound
leakages to the neighbors.Avoid noise pollution to protect the comfortable living environment of those around you.
ETIQUETTE OF SOUND
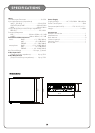
MAINTENANCE
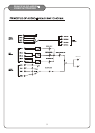
TROUBLESHOOTING
TROUBLESHOOTING
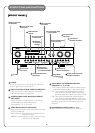
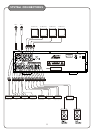
Bad cable or poor contact.
Make sure that all cables are not damaged and all
contact points are proper.
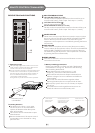
No microp-
hone sound
The microphone cable is not plugged into the
microphone input jack properly.
Make sure the microphone cable is plugged into the
microphone jack properly.
The switch on the microphone is set to “OFF”. Set the switch on the microphone to “ON”.
The corresponding INDIVIDUAL MIC VOLUME control or the
MASTER MIC VOLUME control is in the minimum position.
Adjust the volume control.
The U-shaped connector is not inserted into the MIC
EFFECT jacks or not properly inserted.
Make sure the U-shaped connector is properly inserted
into the MIC EFFECT jacks.
A condenser microphone is used.
Change the condenser microphone to a dynamic microp-
hone or a condenser microphone accepting battery power.
Humming
noise
Grounding problems between two adjacent equipments.
Try to use an isolator to remove the grounding problems.
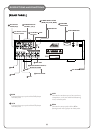
PROBLEM
POSSIBLE CAUSES
SOLUTIONS
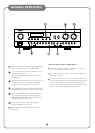
No power
Power is off.
Turn on the mixer.
AC power cord is unplugged. Plug the AC power cord to an AC power outlet (120V).
The fuse inside the transformer is open. Send the mixer to an authorized service center.
One Side
No Sound
One bad RCA cable or one poor RCA contact.
Make sure that all RCA cables are not damaged and all
RCA contact points are proper.
One U-shaped connector is not inserted into the
music effect jacks or one U-shaped connector is not
properly inserted.
Make sure all the U-shaped connectors are properly
inserted.
Distorted
sound
The electrical signal from the output of the player to
the mixer is over the limit of the input of the mixer.
Turn down the master volume control of the player and
turn up the volume control of the mixer to maintain the
same sound level.
Incorrect AC Voltage (The AC power cord is plugged
to a 240V outlet or to an unstable 120V outlet).
Make sure the AC power cord is plugged to an AC power
outlet with a correct and stable AC voltage.
No sound
Incorrect input selection. Make sure the input source selection button is set correctly.
The input level on the rear panel is set to the minimum
position.
Adjust the input level control.
Music volume control knob is turned all the way down
(zero sound output).
Turn the music volume knob to a position that the
sound level is desired.
Both U-shaped connectors are not inserted into the
music effect jacks or not properly inserted.
Make sure all the U-shaped connectors are properly
inserted.