


3.ConnectanEngineeredSound
®
gooseneck microphone with 3-pin XLRM-type output to
theXLRF-typeinputonthemtu201XLRDeskStandTransmitter.
4.Turnonthepowerswitchonthebottomofeachmtu201.ThePowerLEDonthetopof
the base will glow blue. (See Power On/Power Off, page 6.)
5.Confirmlinkstatus.Ifthemtu201XLRDeskStandTransmitterisproperlylinked,theLink
LEDwillglowblueandthetopgreenlightonthecorrespondingaci707channelwilllight.
(See SpectraPulse
®
Owners Manual.)
6. Confirmmute/live audiostatus. When theaudio is on,the elliptical LiveAudio LEDs
glow blue. To change mute status, depress the desk stand transmitter’s soft-touch
switch. (See Audio/Mute LED, page 7). (Note: Switch function is programmable. See
SpectraPulse
®
Owners Manual.)
7.Confirmbatterystatus.Lowbatteryisindicatedbyblinkingpowerlight(atthetopofthe
desk stand transmitter). (See Low Battery Warning, page 7.)
8.Withtheaci707onandconnectedasdesired,thedrm141connected,andtheXLRdesk
stand transmitter on, speak into each microphone and verify audio operation. Set the input
levelsonyourconnectedequipmentasneeded.(Ifconnectedequipmentrequiresline-level
inputs,setDIPSwitch#6tolinelevelasdescribedinDIP Switch 6 selects Line or Mic level
in SpectraPulse
®
Owners Manual). You are now set to use the system.
Note: For SpectraPulse
®
system operation, see SpectraPulse
®
Owners Manual.
What’s in the box:
•SpectraPulse
®
mtu201XLRDeskStandTransmitter(s)
•AAAlkalinebatteries(2batteriespertransmitter)
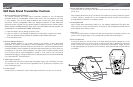
mtu201
XLR Desk Stand Transmitter
Installation & Operation
Thank you for purchasing the mtu201 XLR Desk Stand Transmitter, a component of
Audio-Technica’s SpectraPulse
®
Ultra Wideband Wireless Microphone System. Please
follow the information contained in this manual closely, and refer to the SpectraPulse
®
Owners Manual for system operating instructions.
The mtu201 XLR Desk Stand Transmitter is optimized to work with Audio-Technica
Engineered Sound
®
gooseneck microphones with 3-pin XLRM-type output. The unit
provides phantom power to the microphone and features a programmable touch-sensitive
switch (for push-to-talk, push-to-mute, or toggle operation) and 9-hour rechargeable battery
life.Italsooffersanon/offswitchandLEDsindicatingpower/muteandlinkstatusaswell
aslow-batterywarning.Eachmtu201operatesusing2AAbatteries.Standardalkalineor
NiMHrechargeablebatteriescanbeused.Chargingcontactsonthebaseofthemtu201
allow it to be dropped into the Audio-Technicacei007Charging/EncryptionInterface;see
SpectraPulse
®
Owners Manual for instructions.
1.Insert2 fully chargedrechargeable NiMH AA batteriesor 2 freshAA 1.5V batteries in
eachmtu201XLRDeskStandTransmitter.(SeeBattery Selection & Battery Installation,
page 6). Note: Be certain the NiMH batteries are fully charged: see SpectraPulse
®
Owners Manual.
2.Select a unique channel address on the bottom of each mtu201 XLR Desk Stand
Transmitter.(1-7forthefirstaci707audiocontrolinterfaceunitused;8-14forthesecond
aci707unit).(SeeChannel Address Selection, page 6.)
Contents
What’s in the box Page4
mtu201 Installation & Operation Page4
mtu201 Controls Page 6
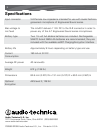
Specifications Page 8
4 5