


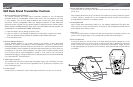

5. Power LED and Low-battery Warning
The Power LED on the top of the desk stand transmitter glows blue to indicate the
power is on.
Whenbatteryperformanceislow,thePowerLEDwillblinkasawarning.Whenthesystem
islinked,a bottomorange LEDonthecorrespondingaci707channelwillilluminate to
provide additional indication of low-battery status.
6. Audio/Mute LED
Whenadeskstandtransmitter’saudioison,theellipticalAudio/Mute LEDsglowblue.
Whentheunitismuted,theLEDsareoff.Aredlightonthecorrespondingaci707channel
also indicates when audio is muted.
7. Link LED
TheLinkLEDglowsbluetoindicatethedeskstandtransmitterisproperlylinkedtothe
system. (The top green light on the corresponding aci707 channel also lights.)
8. Soft-touch Button
A soft-touch button on the front face of the desk stand transmitter operates as a mute
(presson/off)switchoracontrolswitch;tochangemutestatus,depressthesoft-touch
button. Choose the function of the button (Push-to-talk, Push-to-Mute, Toggle, and Off)
at the SpectraPulse
®
aci707AudioControlInterface.(SeeSpectraPulse
®
Owners Manual
for details.)
mtu201
XLR Desk Stand Transmitter Controls
1. Battery Selection and Installation
The mtu201 Wireless XLR Desk Stand Transmitter operates on two AA batteries
(standard alkaline or rechargeable). Please make certain that your batteries are fresh
or fully charged. Two AA 1.5V alkaline batteries are included with each desk stand
transmitter. SANYO rechargeable NiMH AA batteries (preferred for best battery-life
performance)areincludedwiththeoptionalcei007Charging/EncryptionInterface.Note:
Other models of NiMH batteries may work, but the cei007 and the mtu201 are
optimized for use with SANYO NiMH AA batteries.
a Open the battery door by sliding the button down.
b. InserttwofreshorfullychargedAAbatteriesintothebatterycompartment,being
careful to observe correct polarity as marked on the inside of the door.
c. Close the battery door.
2. Channel Address Selection
Channel address selection is via a rotary switch on the bottom of each desk stand
transmitter.Theswitchisnumberedforchanneladdresses1through14;thesechannel
addressescorrespondtotheaudiooutputsontheaci707unit.Usetheprovidedscrewdriver
to select a different channel address for each desk stand transmitter (you cannot have two
microphonesonthesamechanneladdress).TheAudioControlInterface(aci707)comes
fromthefactorysetforchanneladdresses1through7.Ifyouwishtouseitforchannel
addresses8through14,changetheDIPswitchonthebackpaneloftheaci707asdescribed
in the SpectraPulse
®
Owners Manual.
3. XLRF-type Connector
Themtu201XLRDeskStandTransmitterisequippedwitha3-pinXLRF-typeconnector
for connection to any Audio-TechnicaEngineeredSound
®
gooseneck microphone with
3-pin XLRM-type output.
4. Power On/Off
A slide switch on the bottom of each desk stand transmitter turns the unit on and off.
6 7
1
2
4
5
3
6
7
8