


5
Each unit provides two selectable receiving frequencies.
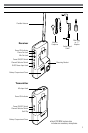
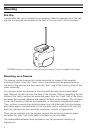
1) Switch the Channel Selector Switch to the same channel as the one selected on
the transmitter (A or B).
2) Attach the receiver to the video camcorder by inserting the mounting bracket
foot into the camcorder’s accessory shoe.
3) Connect the mini-plug audio signal cable from the Mic Out jack on the receiver
to the external mic jack on the camcorder.
4) Attach the monitor earphone to the Phone Out jack on the receiver to listen to
the signal.
5) Turn the Power ON/OFF switch to the ON position (the LED indicator will light).
• Iftheselectedchannelisnoisy,switchboththetransmitterandreceivertothe
other channel.
• Ifthereisa“deadspot”inaroom(indicatedbynoiseontheexternalearphone),
try a slight change of position or try changing frequencies.
• Lowceilingfluorescentlighting,overheadtelephonelinesorcloseproximityto
metal fences can all cause static. If this occurs, try a slight change of position
and/or try changing frequencies.
• Whenthebatteryvoltagedropsbelow6V,theLEDindicatorwillgoout.This
means you need a new battery.
• Turnoffthepowerwhenevertheunitsarenotinuse.Removethebatteriesif
the units will be out of service for a long time.
NOTE: There are no user-adjustable parts inside the transmitter or receiver. Do not
attempt to open or make any adjustments.
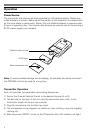
Receiver Operation
Helpful Hints