


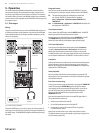
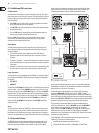

10 B-CONTROL DEEJAY BCD3000 User Manual
The Control Panel (Windows XP only)4.2
The BCD3000 control panel allows you to control some general settings of the
BCD3000. The control panel will be available in the system as soon as the driver
has been installed and the BCD3000 has been connected and switched on.
To start the control panel software, click on the BCD3000 control panel symbol in
the task bar at the bottom right of your screen.
The following basic settings can be selected in the control panel:
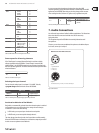
GLOBAL MODE selection:
If STANDARD is selected, you can only adjust the input source for IN A
(Mic or Phono A) and the driver latency on the ASIO page (see below).
The outputs are assigned as follows:
CH 1-2• : channels 1-2 are always routed to the MASTER OUT,
CH 3-4• : channels 3-4 are always routed to the PHONES OUT.
Additionally, the BCD3000’s MIDI characteristics differ from those in ADVANCED
mode (see below). In ADVANCED mode, all selection options are available in the
ASIO window.
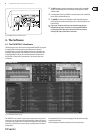
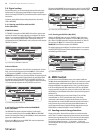
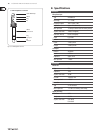
The ASIO page:
Fig. 4.2: The ASIO window in the BCD3000 control panel
This is where you adjust all parameters of the ASIO driver. The TRAKTOR 3 LE
software uses ASIO as is the case with most professional music applications.
You can only select one software button per field.
In the field IN A (CH 1-2), you can select the input source to be routed to the
computer on channels 1-2 (Record).
In the MASTER OUT section, you can select the playback channels CH 1-2 or
CH 3-4 for the main outputs (Playback).
In the PHONES OUT field, you can select the playback channels CH 1-2 or CH 3-4
for the headphones connector (Playback).
Use Driver Latency to adjust the latency in order to optimize your computer’s
performance. If you set the control to “low” this will optimize the response
of your BCD3000, but also increase the processor workload. In extreme cases,
this can lead to clicking and drop-outs in the audio signal. The “mid” position
gives you a good compromise between processor workload and the response
time of the BCD3000. A “high” latency ensures trouble-free performance even
on slow computers.
“Latency” is the time that elapses between an operator action on the ◊
BCD3000 (e. g. pressing the PLAY button) and the actual output of the
audio signal from the OUT connectors. Latency depends on the system
used and the processing speed of your computer. Typical latencies
are in the milliseconds range (1 ms = one thousandth of a second).
Most people cannot hear latencies below 10 ms. When audio signals are
passing through a computer, it is impossible to achieve a 0-ms latency.
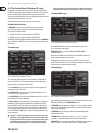
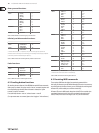
The WDM/MME page:
Fig. 4.3: The WDM/MME window in the BCD3000 control panel
Use the WDM/MME driver if your music software does not support ASIO
(e. g. most software media players).
RECORD SELECT allows you to select BCD3000 input IN A or IN B for
2-channel recording.
When you choose IN A, you can determine in the left-hand field whether the
phono or microphone signal will be recorded.
PLAYBACK of this driver type is always stereo (channels 1-2). For this reason,
the MASTER OUT connectors on the rear panel and the PHONES connector on the
front panel always provide the same music signal.
The MIDI page:
Fig. 4.4: The MIDI window in the BCD3000 control panel
On the MIDI page no parameters can be set. It only informs you about the various
MIDI modes, depending on the GLOBAL MODE selected:
In STANDARD mode, the buttons are “toggle off”, i. e. when you release a button
after pressing, the MIDI command is set back to its original value (like when you
release a key on a keyboard).
In STANDARD mode, all LEDs can be switched on and off individually with
specific MIDI commands.
In ADVANCED mode, all buttons are “toggle on”, i. e. press = “switch on”;
press again = “switch off” the MIDI function (similar to a light switch).
In ADVANCED mode, the response of the button LEDs depends on the respective
button, i. e. LED on = “function enabled”, LED off = “function disabled”.