


6 B-CONTROL DEEJAY BCD3000 User Manual
Installation2.
When using Windows XP, please continue with Chapter 2.1. Mac users continue
with Chapter 2.2.
Installation on Windows XP2.1
First, install the driver on your computer. The driver is provided on the included
“BCD3000” CD-ROM.
Hardware installation on Windows XP2.1.1
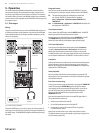
Connect the BCD3000 to a free USB port on your computer1.
Start Windows XP2.
Once your computer has booted, switch on the BCD3000 and wait for the 3.
device to be detected by the system. The “Found New Hardware Wizard”
opens up
Close all applications, in particular those running in the background, such as 4.
virus scanner software
Put the driver/software CD-ROM supplied with the unit into the 5.
CD/DVD drive
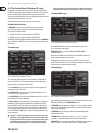
In the first window that opens up, select 6.
“Automatic software installation” and click on “Next >”
If the error message “Driver software has not passed Windows Logo testing” 7.
appears, ignore it and click on “Continue anyway” to install the first part
of the driver
Then click on “8. Finish”
Now the installation window for the WDM driver of the BCD3000 appears 9.
on the screen. Again, select “Automatic software installation” and click
on “Next >”
If the error message is shown again (“Driver software has not passed 10.
Windows Logo testing”), ignore it and click on “Continue anyway”
The second part of the driver is installed11.
Click on “12. Finish”.
The driver installation is complete. After a system reboot, the BCD3000 is ready
for use.
Note for notebook users: If you encounter problems operating the ◊
BCD3000 from your system, please disable the following settings:
In the Device Manager (right click on My Computer > Manage > 1.
Device Manager), click option “Batteries” > disable Microsoft
ACPI-Compliant Control Method Battery.
In the USB Controller, do the following for each single USB Root Hub: 2.
Right click > Properties > Power management > disable the option
“Allow the computer to turn off this device to save power”.
Restart Windows XP. Now the system performance of your computer 3.
should be more stable.
Installing TRAKTOR 3 LE on Windows XP2.1.2
Installation:
Insert the “TRAKTOR 3 LE” CD in the CD/DVD drive.1.
Open Windows Explorer (My Computer > right mouse button > Explorer).2.
In Windows Explorer, select the drive containing the “TRAKTOR 3 LE” 3.
CD (for example, double-click “DVD drive (D:)”).
Double-click the setup file (.exe) to start the installation process.4.
Follow the on-screen installation instructions.5.
After the installation, the TRAKTOR 3 LE software is ready for use.
Now, you can run the TRAKTOR 3 LE program via the Start menu:
Start > All Programs > Native Instruments TRAKTOR 3 LE > TRAKTOR 3 LE.
Installation on Mac OS X2.2
Hardware installation on Mac OS X2.2.1
Connect the BCD3000 to a free USB port of your Mac.1.
The BCD3000 is now ready for use.2.
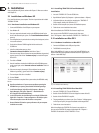
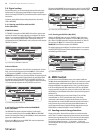
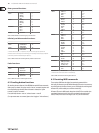
When “Audio MIDI Setup” is open, you see an icon for the BCD3000. You can
find the Audio MIDI Setup application under Macintosh HD > Applications >
Utilities > Audio MIDI Setup.
Fig. 2.1: The BCD3000 in Audio MIDI Setup
Installing TRAKTOR 3 LE on Mac OS X2.2.2
Insert the “TRAKTOR 3 LE” CD in the CD/DVD drive.1.
Double-click the TRAKTOR 3 LE CD icon to display the contents of the CD.2.
Double-click the TRAKTOR 3 LE setup file.3.
The program displays a welcome screen. Press “Continue”. A dialog appears 4.
in which you can specify the type of installation and the target folder.
Follow the on-screen instructions.5.
After the installation, the TRAKTOR 3 LE software is now ready for use.
You can run the TRAKTOR 3 LE program via Macintosh HD > Programs >
TRAKTOR 3 LE and double-click the “TRAKTOR 3 LE” icon.