


LARGE-DIAPHRAGM STUDIO CONDENSER MICROPHONE C-3
4
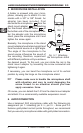
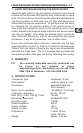
5. MICROPHONE INSTALLATION
A holder is screwed onto your micro-
phone, allowing you to attach it to mic
stands with a 3/8" or 5/8" thread. An
adapter has been included. First
dismantle the microphone from the
stand mount adapter by detaching
the fine-thread shoulder screw at
the bottom end of the microphone. Fas-
ten the adapter onto the microphone
stand, place the microphone into it and
tighten the screw again.
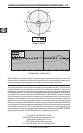
Basically, the microphone in the stand
mount adapter should stand upright and
face the sound source at a right angle.
The angle of the microphone to the
sound source influences the sound of
the recording; therefore, experiment
with different positions until you achieve
the desired sound. To this end, you can rotate the mic in the
stand mount adapter by loosening the screw somewhat and
tightening it again.
If necessary, you can bend the microphone out of its vertical
position by using the hinge on the microphone stand.
Please make sure to handle the microphone shaft
with attention and care to avoid damaging the
screw thread. In no situation should you ever
apply excessive force.
Of course, you can detach the C-3 from the stand mount adapter
and attach it to a commercially available suspension mount.
6. AUDIO CONNECTION
Use a balanced XLR microphone cable with the following pin
assignment: pin 1 = shielding; pin 2 = +; pin 3 = -. Since your C-3
features gold-plated contact points throughout, we recommend
that you use only microphone cables with gold-plated connectors.
6. AUDIO CONNECTION
Fig. 5.1: Attaching
the microphone stand