


5
LARGE-DIAPHRAGM STUDIO CONDENSER MICROPHONE C-3
7. LEVEL SETTING/ADJUSTING THE BASIC SOUND
Adjust the gain control in the microphone channel of your mixing
console so that the peak LED lights up only occasionally or never
at all. The EQ controls in the microphone channel should be set to
mid-travel position to start with; low cut filter and signal level
attenunation should be switched off. To get the sound you want,
try changing the mic position relative to the sound source or
even move the microphone around in the recording room of your
studio. Adjusting the angle at which walls face the sound source
can also be helpful. Only when the desired basic sound has
been achieved, should you start to use equalizers and signal
processors, if any at all (remember: less is often more!)
Due to the extremely linear frequency response and the high
sonic resolution of your C-3, there is no need for high-frequency
“EQing” that can heavily influence the signal and unnecessarily
increase the noise level. The C-3 provides that much-desired
transparency which often gets lost during recording and mixing.
8. WARRANTY
The currently applicable warranty conditions can
be found on our website at http://
www.behringer.com; alternatively via fax +49 2154
9206 4199 or telephone +49 2154 9206 4166.
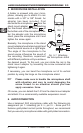
9. SPECIFICATIONS
Transducer type: condenser, 16 mm
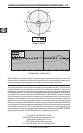
Polar pattern: cardioid, figure 8, omni
Connection: gold-plated balanced
XLR connector
Open circuit sensitivity: -40 dBV/pa (10 mV/pa)
Frequency response: 40 Hz - 18 kHz
Max. SPL (
<
0,5% THD @ 1 kHz): 142 dB
Equivalent noise level: 23 dBA (IEC 651)
Dynamic range: 119 dB
Rated Impedance 350 Ω
Supply voltage: +48 V
Supply current: 7.0 mA
Dimensions: ∅ shaft: 54 mm,
length: 180 mm
Weight: approx. 0.45 kg
9. SPECIFICATIONS