


ENGLISH
PRO MIXER DJX700 User Manual
6
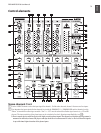
The built-in digital effects processor of your DJX700 can process
the MASTER signal, the input channels’ signal or the micro-
phone signal. Use the SOURCE selector
[33]
to select the
signal on which you want to run the effects. The PROGRAM
display
[34]
located below shows the effect presets that can be
recalled by turning and then pressing the PROGRAM control .
The LEVEL control
[36]
is used to determine the volume of the
effects signal. Use the EFFECTS ON switch
[37]
to turn the
effects on and off.
Various effects are segmented into seven different groups, offer-
ing such standard effects as reverb, delay, echo etc. as well as
additional lter and combination effects.
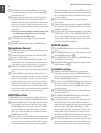
Connections
Rear panel connectors
These are the LINE i. e. CD inputs to connect a tape deck,
[38]
CD or MD player etc. Unlike other channels, channel 1
features two line inputs.
The PHONO inputs for channels 2 to 4 are for connecting
[39]
a turntable.
The GND connectors ground the turntables.
[40]
With the PHONO/LINE switch it is possible to switch the
[41]
input sensitivity of the PHONO inputs 2 to 4 to line level.
This allows you to connect a tape deck or a CD player to
the PHONO inputs.
The DJX700 features an integrated effects loop for the con-
[42]
nection of an external effects device. The MONITOR signal
is taken at the SEND output and routed, for example, to a
reverb processor. Thus, the signal at the SEND connector
is identical to the headphones signal and is selected with
the MONITOR CUE buttons
[16]
.
The externally processed signal is added to the MASTER
[43]
output signal via the RETURN connectors. The effect
signal volume may only be adjusted at the output control of
the effects device itself.
The MASTER output is for connecting to an amplier and
[44]
can be adjusted with the MASTER fader
[18]
.
Always turn the power amps on last to avoid inrush
◊
currents that can easily damage your speakers. And,
to avoid sudden and unpleasant surprises for your
ears, make sure there is no signal at the DJX700 before
turning on the power amps. To be sure, slide all the
faders to the bottom and switch all controls to the zero
position.
The BOOTH output gives you an additional option of con-
[45]
necting an amplier in order to, for example, feed the sig-
nal into your monitors or to bring sound to an extra area.
The BOOTH output level is regulated by using the BOOTH
LEVEL control
[20]
of the MASTER section.
Using the TAPE output you can record your music by
[46]
connecting devices such as tape decks, DAT recorders etc.
Unlike the MASTER output, the output volume is xed,
making it necessary for you to adjust the input level on the
recording device.
The POWER switch powers the DJX700 on. You should
[47]
always make sure that the POWER switch is in the “Off”
position when initially connecting the unit to the mains.