


7
PRO MIXER DX052
3. CONNECTIONS
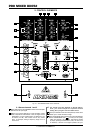
crossfade setting is as it was before. Pressed upwards,
the switch locks into the reversed position (HOLD). To
reset it, simply push it downwards.
You determine the input signals with the PHONO/LINE/LINE
switches. Phono is intended for connecting a turntable.
Line must be selected for all other signal sources (e. g.
CD or MD players). Thanks to switch on the rear, the
phono input can be switched to line level.
+ Never connect devices with line level to the highly
sensitive phono inputs! The output level of phono
pick-up systems is measured in millivolts,
whereas CD players and tape decks have levels
measured in volts, i.e. the level from line signals
is up to 100 times higher than that of the phono
inputs.
The integrated BPM counter is an extremely useful feature.
It ensures smooth transition from one track to the next,
making your session an absolute success. It can calculate
the various tempos of tracks in BPM (beats per minute).
The left display indicates the tempo on channel 1 and the
right display shows the tempo on channel 2.
+ When no signal is present (or when the signal level
is too low), the BPM display shows only dashes.
When the signal is present but can not be identified,
the display shows 160 BPM and then shows the
said dashes. The beat counter then attempts to get
another readout. Therefore, 160 BPM is no usable
value; rather, it is simply an error message when
the signal can not be analyzed.
Adjust the channel volume using the CHANNEL fader.
The CURVE switch next to the channel fader enables you
to select between three fade modes: SOFT, MID and
SHARP. In SOFT mode the fader controls the volume in a
linear, continuous manner. Run a track through one of the
mixers channels and pull the fader down slowly: the
volume will decrease gradually. In SHARP mode the fader
takes on a more logarithmic effect, reducing the volume
faster towards the lower end of the fader range, even if
you move the fader smoothly. MID mode is a combination of
the SOFT and SHARP modes. Flipping the CURVE switch
may cause a sudden change in volume. We recommend
not changing this setting while a signal is present.
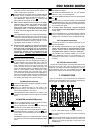
2.2 Microphone channel
Select the volume of the microphone signal with the LEVEL
control in the MIC section.
There is a 2-band equalizer (HI and LOW) in the
microphone section. This allows you to fine-tune your
voice to adapt perfectly to your sound.
The PAN(ORAMA) control determines the position of the
microphone signal within the stereo image of the MASTER
signal.
2.3 MASTER and MONITOR section
This is the MASTER level control to adjust the output
volume at the MASTER output (see ).
The XPQ SURROUND control determines the intensity of
the XPQ 3D surround effect (see chapter 2.5).
The CF CURVE control in the master section is similar to
the CURVE switches in channels 1 and 2 (see ). The
control allows you to fade between the various crossfader
curve modes.
The MONITOR signal is your headphones signal, allowing
you to listen to music without affecting the MASTER output
signal.
The MONITOR LEVEL fader determines the volume of
the headphones signal.
The MONITOR MIXING fader lets you fade between
channels 1 and 2 on your headphones.
The LEVEL METER displays the level of the signal selected
via
.
With this switch you determine whether it is the MASTER
or the MONITOR signal (PFL) to be indicated on the LEVEL
METER. When the PFL LED lights up, it indicates the level
of the headphones signal.
+ In monitor mode, the channel 1 signal is displayed
on the left side of the LEVEL METER, and channel 2
on the right.
The CROSSFADER is for crossfading between channels
1 and 2. Like the channel faders, the crossfader section is
equipped with a professional 45-mm ULTRAGLIDE fader.
2.4 Front panel connectors
The MIC IN connector is the balanced jack input for your
dynamic microphone.
+ We strongly recommend the use of high-grade
cables and connectors for the transmission of audio
signals. Inferior quality materials cannot supply
acceptable audio quality or corrosion protection.
The PHONES OUT connector enables you to preview
tracks (MONITOR signal) on your headphones. Your
headphones should have a minimum impedance of
32 Ohms.
2.5 XPQ 3D surround effect
The XPQ 3D surround function is a built-in effect that puts the
finishing touch to your music and turns every gig into a real
experience. The widening of the stereo base makes for a livelier,
more transparent sound. The XPQ SURROUND control
determines the intensity of the XPQ 3D surround effect.
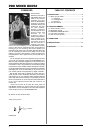
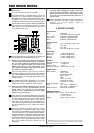
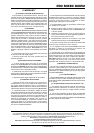
3. CONNECTIONS
With the exception of the microphone and headphones
connectors, all of the DX052s audio connections are located on
the rear panel and supplied as RCA connectors.
Fig. 3.1: PRO MIXER DX052 rear panel connectors
The PHONO inputs for channel 1 and 2 are for connecting
a turntable.
With the PHONO/LINE switch it is possible to switch the
input sensitivity of the PHONO inputs to line level. This
allows you to connect a tape deck or a CD player to the
PHONO inputs.