


8
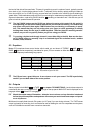
2.1 Highly accurate Main / PFL Peak - reading bargraph meters
Both music channels have highly-accurate PFL (Pre-Fader-Listen) . This means that you can see (on the
bargraph meters ) and hear (on headphones) the music you are about to play without disturbing the main
mix - essential if you want to come in at the same level and in time with the music currently playing. (All
professional DJs strive to do this, often overlapping two tracks, or slowly cross fading between them. These
and other DJ mixing tricks will be explained elsewhere in this manual.)
2.2 How will YOU use YOUR DX100?
Your DX100 is a musical instrument offering you many creative mixing possibilities with its clean, ultra DJ-
friendly control surface. Learn to play it well. If possible, experiment with it off-line - before you use it in a
performance.
2.3 PSU (Power Supply Unit)
Any amplifier circuit is limited in its transient response by the available current. Every mixer has numerous line
level operational amplifiers (op-amps) inside. When being driven hard, many desks begin to show signs of
stress due to power supply limitations. Not so with the PRO MIXER DX100. The sound will always stay clean
and crisp right up to the operating limits of the op-amps themselves, thanks to our generous 20 W external
power supply unit.
Please connect the PSU with the PRO MIXER DX100 PSU connector on the rear panel of your mixer and
switch on your DX100 with the power switch .
+ Do not connect the PSU to the PRO MIXER while the PSU is connected to the mains supply.
Connect switched-off desk and PSU first before you connect the PSU to the mains supply.
2.4 Warranty
Please take time to have the warranty card filled out completely by your specialized dealer and return it within
14 days after the date of purchase, so as to be entitled to benefit from our extended warranty. You will find the
serial number of your DX100 on the rear panel.
2.5 Packing
Your BEHRINGER PRO MIXER DX100 was carefully packed in the factory and the packaging was designed to
protect the unit from rough handling. Nevertheless, we recommend that you carefully examine the packaging
and its contents for any signs of physical damage, which may have occurred in transit.
+ If the unit is damaged, please do not return it to us, but notify your dealer and the shipping
company immediately, otherwise claims for damage or replacement may not be granted.
Shipping claims must be made by the consignee.
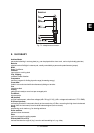
3. INPUT CHANNEL 1 AND 2
Plug a phono (turntable) or line source (CD player etc.) into the appropriate PHONO or LINE input.
Play music at a typical volume to check out and set up the channel.
3.1 Input selection
Stereo inputs and are on the back panel. Your source is selectable between PHONO and LINE by the
toggle switch immediately above the channel fader.
3. INPUT CHANNEL 1 AND 2