


5
EURORACK MXB1002
10
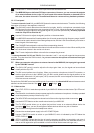
Connect the FX SEND connector to the input of an external effects device.
+ The MXB1002 has no dedicated FX Return connectors. However, you can connect the outputs
of an external effects device to the 1/4" jack inputs of the stereo channels or channels 9/10. In
this case, the stereo channels FX control must be set to -oo to avoid any feedback problems.
1.3.2 Front panel
The mono channels 1 and 2 of your MXB1002 feature the same control elements. Therefore, the following
description of channel 1 also applies to channel 2.
11
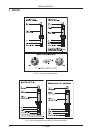
The GAIN MIC control determines the channels input gain, both for a microphone connected via the
XLR jack and for other signal sources connected to the 1/4" jack. Adjust the signal gain so that the Clip
LED below the control lights up during peak signal only, but never permanently. In battery-operated
mode the Clip LED is switched off.
12
Use the PAN control to adjust the signals position on the stereo basis.
13
Your MXB1002 comes with a 3-band equalizer: the HI control governs the high frequency range, the MID
control can be used to boost/cut the midrange frequencies, and the LOW control allows you to raise or
lower the gain of the bass range.
14
The CHANNEL fader adjusts the volume of the corresponding channel.
15
Use the MON control to determine the channel volume sent to the monitor mix bus. When set fully to the
left, the channel volume in the monitor mix is zero.
16
The FX control adjusts the effects volume for the corresponding channel.
The stereo channels 3/4, 5/6, and 7/8 differ from channels 1 and 2 not only with regard to the connectors
provided. They also have two GAIN controls, i.e. you can connect a microphone and a stereo line signal
at the same time!
+ When you connect a microphone to a stereo channel on the MXB1002, the input gain is governed
by the GAIN MIC control!
17
The GAIN LINE control is used to adjust the line input gain. Here, too, the signal can be monitored
visually with the Clip LED.
18
The BAL control performs two functions: When you connect a microphone via the XLR connector, or
another signal source via the L/MONO jack, the BAL control determines the signal position on the
stereo basis. When both 1/4" jack inputs (L & R) are used, the BAL control adjusts the volume balance
of the two sources connected.
Except for the GAIN MIC control and a different set of connectors, the channels 9/10 feature the same control
elements as the stereo channels. See & and through .
1.3.3 Main section
19
The LEVEL DISPLAY reads the output level of your MXB1002. Make sure that the two Clip LEDs wont
light up.
20
Use this switch to activate the phantom power required for condenser microphones. In battery-operated
mode the phantom power provided is only +18 V!
21
The MON SEND control adjusts the volume level of the monitor signal provided at connector .
22
Use the MASTER fader to set the overall volume level of your MXB1002.
23
The FX SEND control allows you to adjust the level that is sent to an external effects device via
connector . Thus, you can drive all types of effects devices without any risk of distortion.
24
The PHONES control governs the headphones volume.
25
Connect the enclosed power supply to the AC POWER IN jack.
26
Use the POWER ON switch to switch on your MXB1002, which is indicated by the LED below the
LEVEL DISPLAY .
27
SERIAL NUMBER. Please take the time to have the warranty card filled out completely, and return it
within 14 days after the date of purchase, so as to be entitled to benefit from our extended warranty. Or
use our online registration option available on the World Wide Web at www.behringer.com).
1. INTRODUCTION