


16 EUROPOWER PMP960M/PMP980S/PMP1680S
17 Quick Start Guide
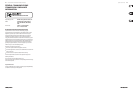
(EN) Step 3: Getting
started
(ES) Paso 3: Puesta en
marcha
(FR) Etape 3 : Mise en
oeuvre
EUROPOWER PMP960M/PMP980S/PMP1680S Getti ng started
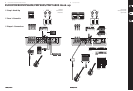
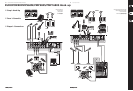
(EN) Make all the appropriate power,
audio and speaker connections to the
mixer. Leave the power on all devices o!
(ES) Realice todas las conexiones de corriente,
audio y altavoces adecuadas a esta mesa de
mezclas; pero ¡recuerde dejar todos los dispositivos
apagados todavía!
(FR) Faites toutes les connexions au mélangeur
(secteur, audio, enceintes). Laissez tous vos
équipements hors tension!
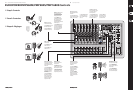
(EN) Select the appropriate operating
mode using the POWER AMP switch.
(ES) Elija el modo operativo adecuado por
medio del interruptor POWER AMP.
(FR) Sélectionnez le mode de fonctionnement
approprié à l'aide du sélecteur POWER AMP.
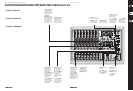
(EN) Set the controls as shown above
(EQ and PAN centered, graphic EQ sliders
centered, all others down/o).
(ES) Ajuste todos los controles tal como le mostramos
arriba (EQ y PAN en el centro, mandos deslizantes
EQ en el centros y el resto abajo del todo/o).
(FR) Réglez comme indiqué (EQ et PAN au centre,
les curseurs d'EQ graphiques au centre, tous les
autres au minimum).
(EN) With the MAIN MASTER knob and
MONITOR MASTER knob all the way
down, turn your mixer on.
(ES) Una vez que se haya asegurado de que los
mandos MAIN MASTER y MONITOR MASTER están al
mínimo, encienda la mesa de mezclas.
(FR) Placez les boutons MAIN MASTER et MONITOR
MASTER au minimum et placez le mélangeur
sous tension.
(EN) Slowly turn the MAIN MASTER knob
up / of the way to start.
(ES) Para empezar, suba lentamente el
mando MAIN MASTER hasta / de su recorrido.
(FR) Montez lentement le bouton MAIN MASTER d'un
tiers pour commencer.
(EN) Adjust the relative level of various
microphones and instruments by raising
each channel’s LEVEL knob.
(ES) Ajuste el nivel relativo de los distintos
micrófonos e instrumentos conectados subiendo el
mando LEVEL de los distintos canales.
(FR) Réglez le niveau de chaque micro et instrument
à l'aide des boutons LEVEL de chaque voie.
(EN) For line-level inputs, press the PAD
button to avoid clipping. If a channel’s
CLIP LED lights, press the PAD button or
turn the LEVEL knob down if the PAD is
already engaged.
(ES) Para las entradas de nivel de línea, pulse el botón
PAD para evitar la saturación. Si se enciende el piloto
CLIP de algún canal, pulse el botón PAD o baje el
mando LEVEL si el botón PAD ya estaba activado.
(FR) Pour les signaux à niveau ligne, appuyez sur la
touche PAD pour éviter toute saturation. Si la Led
CLIP d'une voie s'allume, appuyez sur la touche PAD
(ou baissez le réglage LEVEL si la touche PAD est
déjà enfoncée).
(EN) Adjust the left-right position of a
channel in the stereo eld if necessary by
turning the channel’s PAN knob.
(ES) Si es necesario, ajuste la posición izquierda-
derecha de un canal dentro del campo stereo girando
el mando PAN de dicho canal.
(FR) Réglez la position de la voie dans le champ
stéréo à l'aide du bouton PAN de la voie.
(EN) Use the channel MON knobs to
send the channel’s signal to
monitor speaker(s).
(ES) Use los mandos MON de canal para enviar la señal
de dicho canal a los monitores.
(FR) Utilisez le bouton MON de chaque voie pour
transmettre le signal de la voie dans les retours.
(EN) Adjust the overall output to the main
speakers using the MAIN MASTER knob.
Adjust the output to the monitor
speakers using the MONITOR MASTER knob. If the red
CLIP LEDs on either of the METERS light, lower the
respective MASTER knob.
(ES) Ajuste el nivel de salida global enviado a los
altavoces principales usando el mando MAIN
MASTER. Ajuste la salida de los monitores por
medio del mando MONITOR MASTER. Si se iluminan
los pilotos CLIP de cualquiera de los MEDIDORES,
reduzca al mando MASTER respectivo.
(FR) Réglez le niveau général de sortie avec le bouton
MAIN MASTER. Réglez le niveau général des retours
avec le bouton MONITOR MASTER. Si l'une des Leds
CLIP de l'acheur de niveaux s'allume, baissez le
MASTER correspondant.
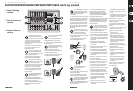
(EN) The PMP series mixers have built-in
eects processor(s). Follow these steps to
add an eect to one or more channels:
Turn the FX 1 knob up half way on each channel •
that you would like to add an eect to.
Press the FX 1 IN button to engage the processor. •
Turn the FX RET 1 knob in the MAIN section up half •
way to start. You may adjust it later. If you would
also like the eect to be heard in the monitor mix,
turn the FX RET 1 knob in the MONITOR section up
half way as well.
Scroll through the eects by turning the •
PROGRAM knob. Press the PROGRAM knob to
select the eect.
Readjust each channel’s FX 1 knob to make sure •
the right amount of eect is added.
If the METER on the multi-FX display reaches the •
red CLIP LED, turn the channel FX knobs down.
For the 1680S/980S, repeat the process with the •
FX 2 and FX RET 2 knobs to add a second eect to
various channels.
Phantom Power – Move the switch to +48 V when
using condenser microphones.
(ES) Las mesas de mezclas PMP series disponen de
procesadores de efectos internos. Siga estos pasos si
quiere añadir un efecto a uno o más canales:
Gire el mando FX 1 a mitad de su recorrido en los •
canales en los que quiera añadir un efecto.
Pulse el botón FX 1 IN para activar ese procesador. •
Para empezar, gire hasta la mitad el mando •
FX RET 1 de la sección MAIN. Puede retocarlo
después. Si también quiere escuchar el efecto en
la mezcla de monitores, gire también a la mitad el
mando FX RET 1 de la sección MONITOR.
Pase por los distintos efectos girando el •
mando PROGRAM. Pulse dicho mando para
elegir un efecto.
Reajuste el mando FX 1 de cada canal para •
asegurarse de que sea añadida la cantidad de
efecto deseada.
L R
SI el MEDIDOR de la pantalla del multiefectos •
llega hasta la marca CLIP, baje los mandos FX
de canal.
En el 1680S/980S, repita este mismo proceso •
con los mandos FX 2 y FX RET 2 si quiere añadir
un segundo efecto a los distintos canales.
Alimentación fantasm – Coloque el
interruptor en la posición +48 V cuando utilice
micrófonos condensadores.
(FR) Les mélangeurs de la gamme PMP sont
équipés de processeurs d'eets. Voici comment
les utiliser:
Tournez le bouton FX 1 en position centrale sur •
chaque voie nécessitant de l'eet.
Appuyez sur la touche FX 1 IN pour •
activer le processeur.
Tournez le bouton FX RET 1 de la section •
MAIN en position intermédiaire pour
commencer. Vous pouvez le modier plus
tard. Si vous souhaitez également ajouter
l'eet dans les retours, placez également le
bouton FX RET 1 de la section MONITOR en
position intermédiaire.
Consultez les eets à l'aide du bouton •
PROGRAM. Appuyez sur le bouton PROGRAM
pour sélectionner l'eet.
Réglez le bouton FX 1 de chaque voie en •
fonction du dosage d'eet souhaité pour
chaque voie.
Si l'acheur de niveau du multi-eet atteint •
le niveau CLIP, baissez les réglages FX de
chaque voie.
Pour les modèles 1680S/980S, répétez les •
mêmes opérations avec les boutons FX 2
et FX RET 2, pour ajouter un deuxième
eet aux voies.
Alimentation fantôme – Placez le sélecteur en
position +48 V lorsque vous utilisez vos
micros à condensateur.
+
48 V
OFF
PHANTOM