


10
U-CONTROL UMX49/UMX61
Please note two exceptions in conjunction with the push-
buttons and/or the sustain pedal.
If you assign CC 07 (Channel Volume) to the push-
buttons, a channel volume of 0 is triggered each
time you press the push-button. This means the
channel is always mute. This feature is very useful
for live operation.
If you use controller CC 10 (panning) for the push-
buttons or the sustain pedal, pressing the control
element transmits value 64. This results in hearing
the content of the channel in the center of the
stereo panorama.
Der Befehl “All Notes Off” wird sofort gesendet,
nach-dem Sie eine der beiden Tasten gedrückt
haben.
4.2.8 Program and bank change
You have three different optionsachieving a program change
in external devices with the UMX. This is a very powerful function,
which will enable you to use the full spectrum of all of your
sound producers.
Options a) and b) will allow you to select any programs by
means of a defined selection procedure, which always has to
be completed. The process is generally accelerated in the third
option c), so that you will be able to directly select programs by
pressing the push-button once.
a) If you are sure that you want to select from 128
different programs only, you will achieve the ASSIGN
mode program change by the following method. As soon
as the quantity of 128 is exceeded, however, you must
apply the process described under paragraph b).
1) Press the ASSIGN push-button and hold it down.
2) Press one of the 16 white channel keys through
on the keyboard. You have now defined the
channel by which the program change will be transmitted.
3) Release the ASSIGN push-button.
4) Press the key.
5) Press the number keys in sequence until you have
completely entered the desired program number. Only value
entries between 0 and 127 are possible. Greater values
are ignored by the device.
Example:
- Press and if you have decided on
program 15, for example.
- Press , and if you would like
to select program 127.
6) Press the key. In order to discard your assignments,
please press the key or press the ASSIGN push-
button again. The ASSIGN LED will go off in all 3 cases.
b) If you have more than 128 programs, you must apply
the following process to achieve a program change. In
this case, your programs will be organized in banks which
are activated by a special MIDI command: the BANK
SELECT command. In the following section, this
command is briefly described. A brief introduction for
this is listed in the following:
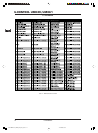
The BANK SELECT command consists of two parts: An MSB
part and an LSB part.
The MSB part describes a value range of 128 different values
and is the more important part of the DATA BASE SELECT
command for many external devices.
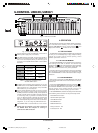
4. OPERATION
4.2.7 Assignment of control elements
We explained in chapter 4.2.2 how an individual channel can
be assigned to each control element. You will now find out how
to assign new controllers and a channel.
a) The assignment for rotary controls R1 - R8, the
MODULATION controller, the PITCH BEND wheel, as well
as the DATA fader
1) Press the ASSIGN push-button and hold it down.
2a) If you would like to assign one of the eight rotary controls,
turn the respective controller.
2b) If you assign the MODULATION controller, please activate
one of the keys located below the lettering
, , or
. You can bypass step 5, if you decide on the
and/or the key. The MIDI controller
“MODULATION” (CC 1) and/or “CHANNEL VOLUME” (CC
7) is then directly assigned to the MODULATION controller
without having to enter a controller number first.
2c) If you assign the PITCH BEND wheel, please activate one
of the keys located below the lettering
, or . You can
bypass step 5, if you decide on the key. The
original pitch bend function is then directly assigned to
the PITCH BEND wheel.
2d) If you complete an assignment for the DATA fader, please
activate one of the keys located below the lettering
, or . You can bypass
step 5 if you decide on the key. The original volume
function is then directly assigned to the DATA fader.
3) Release the ASSIGN push-button again.
4) Press one of the 16 channel push-buttons
through to define the channel.
5) Press the number keys on the keyboard in sequence until
you have completely entered the desired controller number.
Only value entries between 0 and 127 are possible. Greater
values are ignored by the device.
Example:
- Press and if you have decided on CC 14,
for example.
- Press , and if you would like to
select CC 107.
6) Finally press the key. In order to discard your
assignments, please press the key or press the
ASSIGN push-button again. The LED of the ASSIGN push-
button will go off in all 3 cases.
b) Assigning push-buttons B1 - B8 and the optional sustain
pedal connected to the socket .
1) Press the ASSIGN push-button and hold it down.
2) Press the related control element once (however, it is not
necessary to continue pressing it).
3) Release the ASSIGN push-button again.
4) Press one of the 16 channel push-buttons
through to define the channel.
5) Press the number keys on the keyboard in sequence until
you have completely entered the desired controller number.
Only value entries between 0 and 127 are possible. Greater
values are ignored by the device.
6) Finally, press the key. In order to discard your
assignments, please press the key or press the
ASSIGN push-button again. The LED of the ASSIGN push-
button will go off in all 3 cases.
DATA-MANFULL_UMX49_ENG_Rev_A.pmd 12.01.2006, 20:3710