


10 U-CONTROL UMX250 User Manual
Local o4.2.6
The eect of LOCAL OFF is that any data entries made with the control elements
will NOT be passed on to the MIDI OUT connector or the USB OUT. In LOCAL OFF
mode you can, for example, re-adjust the rotary controls without sending any
information to the external devices connected—which would normally be
the case.
Press the ASSIGN button and keep it pressed.1)
Press the LOCAL OFF key.2)
Release the ASSIGN button and adjust the control elements as required.3)
Finalize your selection with ENTER, CANCEL or ASSIGN. In either case the 4)
ASSIGN LED goes out and the UMX250 enters Play mode again.
Control elements assignment4.2.7
In Chapter 4.2.2 we described how to assign an individual channel to each control
element. Here you will learn how to assign new controllers.
This procedure applies to the MODULATION wheel, the DATA/VOLUME fader,
the rotary controls R1 – R8, the buttons B1 – B8 and to the optional sustain pedal
connected to jack (15).
Press the ASSIGN button and keep it pressed.1)
Move or press the corresponding controller or button respectively, or hold 2)
down the sustain pedal.
Release the ASSIGN button.3)
Press the number keys on the keyboard to enter the controller number of 4)
your choice. Only values between 0 and 127 can be entered. Higher values
are ignored by the device.
Examples:
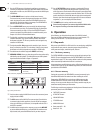
To enter CC 14 press keys • ( 1 ) and ( 4 ).
If you want to select CC 107, press • ( 1 ), ( 0 ) and ( 7 ).
Press ENTER to conrm. To discard your assignments either press the CANCEL 5)
button or the ASSIGN button again. In either case the ASSIGN LED goes out.
Please note two special cases with regard to a button or the sustain pedal:
If you assign CC 07 (Channel Volume) to a button, the channel volume ◊
“0” is sent each time you press the button. This will always mute the
channel, which is a very interesting feature when playing live.
If you use the controller CC 10 (Panorama) for the buttons or sustain ◊
pedal, pressing the control element will send out a value of 64. As a
consequence, the channel will always be set to center position in the
stereo panorama.
Program and bank change4.2.8
The UMX250 provides three options to change programs on external devices.
This is a very powerful function which allows you to fully exploit the multitude of
functions of your sound modules.
Options a) and b) allow you to select any programs using a dened selection
procedure. Option c) speeds up the procedure, so that you can select programs at
the touch of a button.
If you are sure to select only one of 128 dierent programs, a)
you can eect program changes in ASSIGN mode as shown below.
However, if the number of 128 is exceeded, you will have to use the
procedure described in section b).
Press the ASSIGN button and keep it pressed.1)
Press the SINGLE key.2)
Release the ASSIGN button.3)
Now dene the SINGLE CHANNEL by entering a number from 1 to 16 using 4)
the number keys. In order to assign the GLOBAL CHANNEL, please press the
( 0 ) instead.
Press the PROGRAM button.5)
Press the number keys on the keyboard to enter the program number of your 6)
choice. Only values between 0 and 127 can be entered. Higher values are
ignored by the device.
Examples:
To enter program 15, press keys • ( 1 ) and ( 5 ).
If you want to select program 127, press • ( 1 ), ( 2 ) and ( 7 ).
Conrm your selection with ENTER. If you do not like the selected program, 7)
discard your selection with CANCEL or press the ASSIGN button again.
In either case, the ASSIGN LED goes out.
If you want to make a selection from more than 128 programs, b)
please use the following program change procedure. In this case
your programs will be organized in banks, which can be selected
with a special MIDI instruction called BANK SELECT. Here’s how
it works:
The BANK SELECT instruction consists of two parts: one MSB part and one
LSB part.
The MSB part describes a value range comprising 128 dierent values. On many
devices this is the more important part of the BANK SELECT instruction.
The LSB part describes each of the 128 MSBs using 128 additional single steps.
In both cases the numbering is from 0 to127.
In total, the BANK SELECT instruction oers the enormous value range of
128 x 128 = 16,384 dierent values. In theory, this means that you could use
external devices with as many dierent banks. Considering the fact that each
single bank includes another 128 single programs, you get the unbelievably large
number of 2,097,152 programs for you to organize.
Press the ASSIGN button and keep it pressed.1)
Press the SINGLE key.2)
Release the ASSIGN button.3)
Now dene the SINGLE CHANNEL by entering a number from 1 to 16 using 4)
the number keys (as described in chapter 4.2.2). In order to assign the
GLOBAL CHANNEL, please press ( 0 ) instead.
Press the BANK MSB key. Press the number keys on the keyboard to enter 5)
the BANK MSB number of your choice.Only values between 0 and 127 can
be entered. Higher values are ignored by the device. The BANK MSB is
now dened.
Examples:
To enter MSB 14, press keys • ( 1 ) and ( 4 ).
If you want to select MSB 107, press • ( 1 ), ( 0 ) and ( 7 ).