


6 X V-AMP LX1-X User Manual
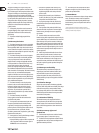
STORE
NOISE G.
COMPR.
REVERB
MODUL.
DELAY
PEDAL
CONFIGURE
BASS EQ PRESENCE
GAIN
2
ND
FUNCTION
COPY
/ VOLUME
ADJUST
TAP
BYPASS/TUNER
TUNER
PHONES
AMP + FX EFFECT
SPEED
VOLUMEFX ONLY
C
O
N
F
I
G
U
R
A
T
I
O
N
P
E
D
A
L
A
S
S
I
G
N
WAH
1
2
3
4
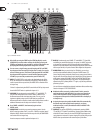
(13)
(18)
(15) (14) (19) (20) (21) (22)
(7) (8) (9) (10) (11)(16)
(4)
(5)
(6)
(2)
(3)
(1)
(12) (17)
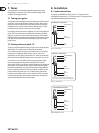
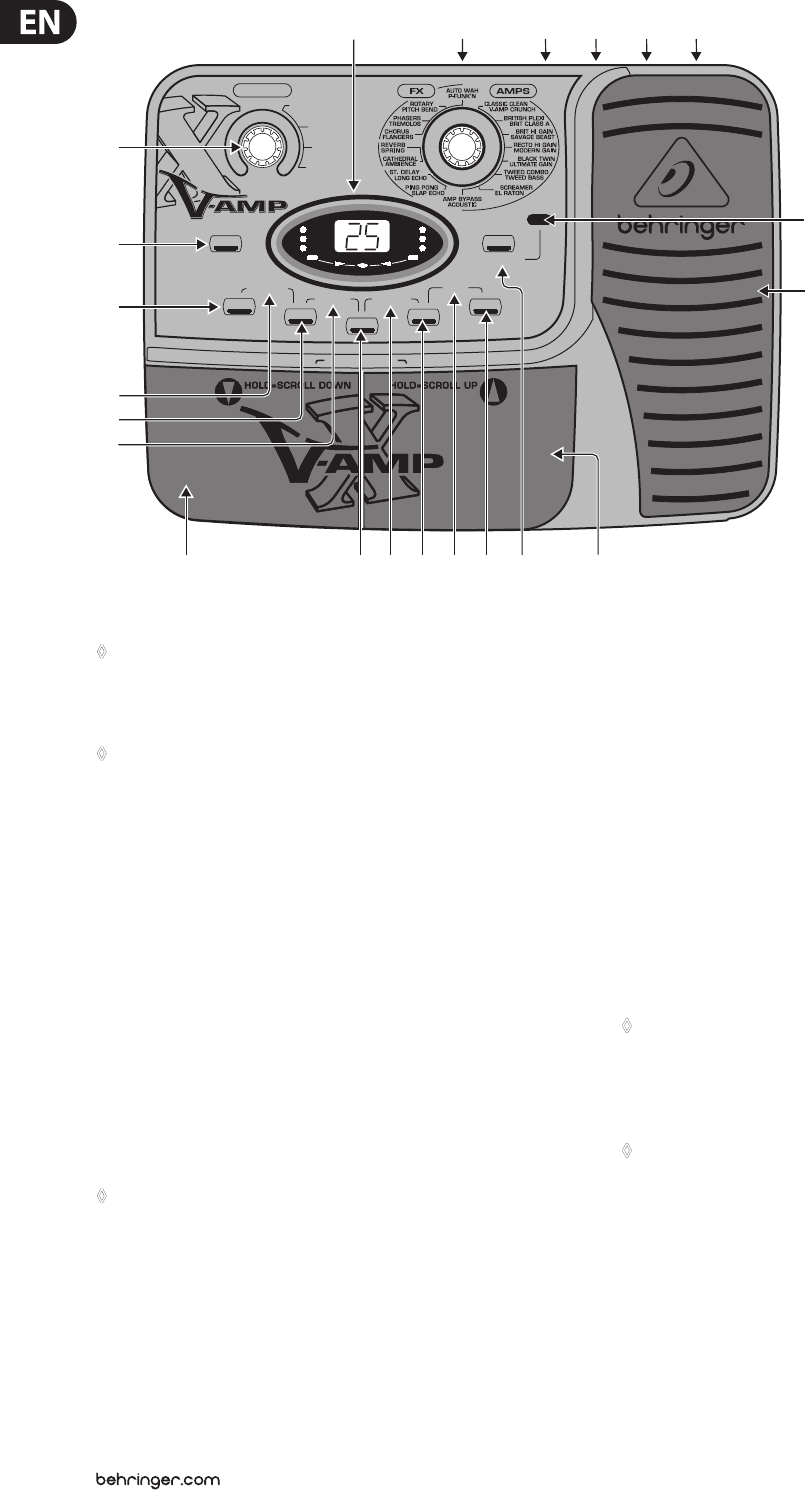
Fig. 2.1: X V-AMP user interface
◊ After briefly pressing the STORE key (the STORE key blinks), use the
UP/DOWN keys to select another storage slot. By briefly pressing the
STORE key yet again, the save procedure is canceled. Complete the save
by keeping the STORE key depressed for longer than 2 seconds.
◊ You can restore a single factory preset by keeping the TAP and STORE
keys depressed simul-taneously for longer than 2 seconds. You can also
restore all factory presets. This is done by keeping both TAP and STORE
keys depressed for longer than 2 seconds and then powering up the
X V-AMP (i.e. you start the procedure when your X V-AMP is off).
(3) NOISE G. The NOISE GATE is active and can be edited when the key LED is
lit up. The threshold can be controlled by using ADJUST. When the ADJUST
control is turned all the way to the left, the NOISE GATE is o and the LED is
no longer lit up.
“Release” is adjusted using the ADJUST control while the TAP key is depressed.
How the NOISE GATE works is explained in chapter 6.1.3.
(4) CONFIGURE. By simultaneously pressing NOISE G. (3) and COMPR. (5),
youget to the conguration menu. Use the COMPR. or NOISE G. keys
to alternate between indi-vidual operating modes. This way, youcan
implement a global setting on your X V-AMP that lets you adjust to
dierent studio and live situations. A table with all congurations as well as
additional information on this subject can be found in chapter 3.
◊ Press COMPR. and NOISE G. simultaneously again to leave
CONFIG. mode.
(5) COMPRESSOR. Press this key to get to the compressor menu. Use the
ADJUST control to regulate “ratio”, or use TAP + ADJUST to regulate “attack”.
When the ADJUST control is turned all the way to the left, the COMPRESSOR
is o and the LED is no longer lit up.
How the compressor works is explained in chapter 6.1.3.
(6) BASS EQ. Simultaneously press COMPR. (5) and MODUL. (7) (both LEDs
are blinking) to control bass frequencies in a preset. Use ADJUST to increase
or decrease low frequencies. Keep TAP pressed while turning ADJUST to
determine if you want to aect only the deepest frequencies (ADJUST turned
all the way to the left) or if you also want to aect higher bass frequencies.
(7) MODULATION. After you press this key (its LED blinks), you can select
one of the eight modulation eects by using the FX/AMPS control (14) :
Chorus,anger, phaser, pitch bend, tremolo, rotary, auto wah and P-funk’n.
You get to the second-layer eects (gray) by keeping the TAP key depressed
while you are turning the FX/AMPS control; the 2nd FUNCTION LED lights
up. ADJUST controls the eect ratio in the preset. The speed parameter is
adjusted using TAP. By hitting MODUL. (7) again, or by selecting a dierent
parameter, you quit.
You can nd a more detailed description of modulation eects and how they
function in chapter 6 “EFFECTS PROCESSOR”.
◊ Modulation effects auto wah, pitch bend and P-Funk’n cannot be
used simultaneously with Wah Wah. If you select one of these three
effects while the pedal is already assigned to the wah wah effect,
its assignment to the pedal is annulled (the WAH LED in the display is
no longer lit up).
◊ Assigning the expression pedal to the Wah Wah effect automatically
deactivates auto wah and pitch bend respectively, so that no
modulation effect is active (all modulation effect and ADJUST LEDs
are no longer lit up).
(8) PRESENCE. You activate PRESENCE by simultaneously pressing MODUL.
(7) and DELAY (9) (both LEDs are blinking). Starting at the middle setting
of the ADJUST control (neutral), the share of PRESENCE (high frequencies)
canbe lowered or increased in a preset. Keeping TAP pressed while you turn
ADJUST allows you to determine the center frequency of the lter.