


behringer.com
8 XENYX XL1600/XL2400/XL3200 User Manual
Installation3.
Rack mounting (XL1600 only)3.1
The packaging of your XL1600 contains two 19" rack mounts that can be fastened
to the side panels of the console.
Before you can attach the rack mounts to the mixing console, you need to remove
the screws holding the left and right side panels. Then, use these screws to
fasten the two rack mounts, each specically to one side. After attaching the
rack mounts, you can mount the mixing console in a standard 19" rack. Be sure
to allow for proper air ow around the unit, and do not place the mixing console
close to radiators or power amps, so as to avoid overheating.
Only use the screws holding the mixing console side panels to fasten ◊
the 19" rack mounts.
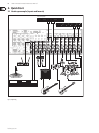
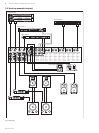
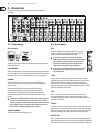
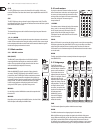
Audio connectors3.2
The ¼" inputs and outputs of the BEHRINGER XENYX mixer are unbalanced
mono TS connectors except for the balanced Line inputs on the mono and stereo
channels as well as the Main Out connectors. Of course, you can use the mixer
with balanced as well as unbalanced ¼" connectors. The CD/TAPE inputs and
outputs are stereo RCA connectors.
Make sure that only competent people install your mixer. They must be ◊
sufficiently grounded during and after the installation process.
Otherwise, electrostatic discharges may negatively affect the operating
characteristics of your equipment.
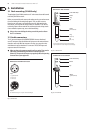
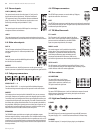
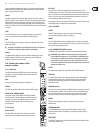
Fig. 3.1: XLR connector
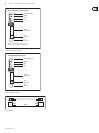
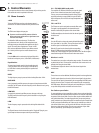
Fig. 3.2: ¼" TRS connector
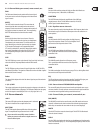
Fig. 3.3: ¼" TS connector
output
For unbalanced use, pin 1 and pin 3 have to be bridged
1 = ground/shield
2 = hot (+ve)
3 = cold (-ve)
input
12
3
1
2
3
Balanced use with XLR connectors
strain relief clamp
sleeve
ring
tip
sleeve
ground/shield
For connection of balanced and unbalanced plugs,
ring and sleeve have to be bridged at the stereo plug.
Balanced ¼" TRS connector
ring
cold (-ve)
tip
hot (+ve)
Strain relief clamp
Sleeve
Tip
Sleeve
(ground/shield)
Unbalanced ¼" TS connector
Tip
(signal)