


califone.com
8
FAST REVERSE
Press this key for fast backward search. You can select the speed of
2X, 4X, 8X, 20X.
FAST FORWARD
Press this key for fast forward search. You can select the speed of
2X, 4X, 8X, 20X.
SKIP BACKWARD
Press this key to skip to the previous chapter or song.
SKIP FORWARD
Press this key to skip to the next chapter or next song.
MUTE
Press this key to mute the audio. Press again to unmute the audio.
PITCH ADJUSTMENT
Press the Pitch + or Pitch - on the remote control to adjust the pitch
setting.
5. SETUP AND INSTALLATION
5.1 AC Operation
1. Turn all of the volume controls to their minimum setting.
2. Insert the DC plug, at the end of the AC adapter cord into the DC
input jack.
3. Plug the AC adapter into AC power outlet socket. Use only with
the included power adapter and make sure the local voltage cor-
responds on the adapter’s required AC input voltage.
4. Turn on the power switch.
NOTE: If the AC plug of this unit does not t in your AC outlet, a plug
adapter (not supplied) should be used.
5.2 Battery Operation
1. To enable battery operation, rst ensure that the internal battery
is fully charged. To do this, follow the instructions above for AC
Operation and let the battery recharge for at least 7 hours.
2. When the battery is charging, the CHG LED will light red. It will
turn green when the battery is fully charged.
califone.com
9
6. BASIC OPERATION
6.1 Remote Control
Before the rst use, open the battery cover, located on the back of
the remote control. Remove the protective plastic lm. The remote is
now ready for use.
• The remote control may be used to operate the PA419 within
13 feet (4 meters) from the front or rear of speaker, within a 45
degree angle.
• The remote control battery should last for about a year. When
the remote ceases to work, it may be time to change the battery.
Open the remote control battery cover and replace the old
battery with a new CR2025.
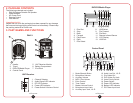
6.2 Control Panel
Microphone Input (MIC IN)
Connect a microphone to the microphone input jack. The Microphone
Volume is used to control the level of the input signal.
Music/Speech
Press this button to change the microphone input setting. When
button is up, it is set to speech and should be used when a
microphone is connected to the input. When connecting a sound
source (such as an external media player, the button should be set in
the down position to enable full bandwidth music playback.
Line In (AUX IN)
Connect to the aux input jacks using RCA or 3.5mm plugs. The Aux
Volume is used to control the level of the input signal.
Line Out (LINE OUT, VIDEO OUT)
RCA jacks are used to connect to the input of another piece of
equipment such as a stereo, mixer or another amplied speaker.
The line outputs are independent of the Master Volume control.
Voice Priority
This feature is used for voice override of the music program when
using any microphone. The “ducking” circuit attenuates the music
when a person speaks into the microphone. After a 3 second delay
in the speech, the music returns to the previous level. Note: This
function does not affect the iPod/iPhone audio output.