


Operating Instructions
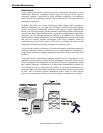
(1) Verify that the associated wireless-microphone receiver is on the exact same
frequency as the T-680 Series transmitter to be used.
(2) Set up, adjust, and connect the receiver as described in its instruction manual.
(3) Verify that the transmitter's battery is fresh.
(4) Turn on the transmitter via the switch on the bottom (toward the dot). The LED
indicator should flash briefly upon turn-on; this indicates that the battery is installed
properly.
NOTE: The LED does not provide an indication of battery condition. If there is any
question as to the condition of the battery, it should be replaced prior to use of the
transmitter.
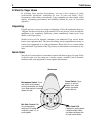
(5) Turn “on” the microphone in the transmitter via the switch on the bottom of the
unit (toward the dot). Make an initial adjustment of the microphone gain control of
about one-quarter turn from the minimum (fully counterclockwise) position.
(6) With the receiver and transmitter on, the “SQUELCH” indicators on the receiver
should be illuminated. Observe the RF-level meter (or bargraph) on the receiver. If
the meter does not read well above midscale when the transmitter is within a clear
50-foot radius of the receiver, difficulties are indicated (refer to section “In Case of
Difficulty”).
(7) Speak into the microphone at normal voice level. The audio meter on the
associated receiver should indicate audio on voice peaks, and the audio should be
audible on the associated monitoring equipment. The audio may also be monitored
on headphones plugged into the receiver “monitor” jack.
(8) Adjust the transmitter audio gain control, if necessary. When speaking or singing
very loudly, the LED on the transmitter should flash “on” only on the very loudest
voice peaks. This indicates that the transmitter is reaching the point where soft gain
compression is occurring in the microphone preamplifier. If the system is correctly
set up, the compression point will be reached only rarely.
Internal adjustments are not required for normal operation. Only qualified
experienced technicians should open the case. Unauthorized adjustments or repairs
inside the equipment case can void your warranty and cause unnecessary repair cost.
If you feel that internal adjustments or repairs are needed, we recommend you
contact the factory or your nearest authorized service center.
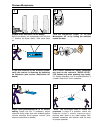
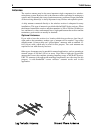
(10) “Walk” the coverage area to ensure that there are no areas of poor coverage.
Signal “dropouts” (little or no signal in small areas) show up as a flickering of the
“SQUELCH” indicator on the receiver and a brief “fizzing” sound in the audio (which
may or may not be followed by a silent period due to squelched audio). The audio may
be conveniently monitored with headphones plugged into the front-panel
“MONITOR” jack on the receiver. If there is an area where a “dropout” occurs, the
receiving antenna(s) can usually be repositioned to eliminate the problem. Frequently,
a change of just a few inches in location will completely solve the problem.
Wireless-Microphones 5