


260BAY Rev. A, 6/07
2 of 7
A
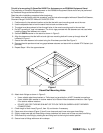
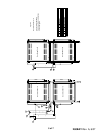
Figure 1
SteamChef Mounting Holes
This kit is for mounting (2) SteamChef 22CGT3 or 6 steamers on an ES263044 Equipment Stand.
The Installation of Cleveland Range steamers on the ES263044 Equipment Stand should only be performed
by Cleveland Range authorized technicians.
Read the entire installation procedure before beginning.
The installer must be familiar with this procedure, and the instructions supplied with each SteamChef Steamer,
Cleveland Range P/N 22CGT-INM and P/N 22CGT-OPM.
1. Position stand in the selected location so that the feet with round mounting pads are at the rear.
2. Use the adjustable feet to level the stand front-to-back and side-to-side.
3. The stand must be anchored to floor through holes in the round mounting pads in the rear feet.
4. Do NOT screw the 4” legs into steamers. The 4-inch legs provided with the steamers are not used when
installing SteamChef steamers on a stand.
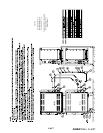
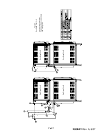
5. Set the LOWER steamer on the stand as shown in Figure 3.
6. Align the steamer so that the left front and right rear mounting bolts will come up through holes “A”
indicated in Figure 1.
7. Secure the lower steamer to the stand using the 2 hardware provided See Figure 3.
8. Remove the side panels and seal any gaps between steamer and stand with a suitable RTV Sealant (not
provided).
9. Repeat Steps 1-8 for the upper steamer.
10. Attach drain fittings as shown in Figure 3.
• Use a suitable pipe thread sealant or Teflon tape (not provided) on all NPT threaded connections.
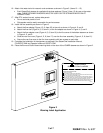
• Use a suitable plain washer or strainer washer at all Garden Hose threaded connections. See Figure
2 for strainer washer locations.
• DO NOT USE PIPE THREAD SEALANT OR TEFLON TAPE ON GARDEN HOSE THREADED
CONNECTIONS.
11. Check length of drain hose (Figure 3, Item 10) and shorten if necessary.
12. Place worm drive clamps (Figure 3, Item 9) over hose and push hose onto upper hose fitting.
13. Slightly rotate lower tee and hose fitting counter-clockwise until lower end of hose can start onto fitting.
14. Slide hose fully onto fitting by rotating tee and fitting back to their original vertical position.
15. Secure hose to fittings with worm drive clamps.