


260BAY Rev. A, 6/07
3 of 7
WARNING
112523 A
BURN AND SCALD HAZARD
EXPOSURE TO STEAM, CONDENSATE, AND HOT SURFACES CAN
CAUSE BURNS AND SCALDS.
TO HELP AVOID INJURY:
DO NOT BREATHE STEAM OR CONDENSATE.
STAND ON THE HINGE SIDE AND AWAY FROM THE APPLIANCE AND SLOWLY
OPEN THE COOKING COMPARTMENT DOOR.
OPEN THE DOOR SLIGHTLY TO ALLOW STEAM, CONDENSATE AND HEAT TO
VENT BEFORE LOOKING OR REACHING INTO THE COOKING COMPARTMENT.
ALWAYS WEAR DRY HEATPROOF GLOVES WHEN REACHING INTO THE
COOKING COMPARTMENT OR HANDLING HOT ITEMS. WET OR DAMP GLOVES
CONDUCT HEAT AND MAY CAUSE BURNS WHEN HANDLING HOT ITEMS.
Figure 2
Warning Label Application
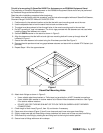
16. Attach inlet water trains for reservoir and condenser as shown in Figure 3. (Items 12 – 15).
• Each SteamChef steamer is supplied with strainer washers (Figure 3, Item 13) for use on the water
inlets. THESE STRAINER WASHERS MUST BE USED ON THE STEAMER WATER INLET
CONNECTIONS.
17. After RTV sealant has set, replace side panels.
• Do not seal side panels to unit.
• Side panels must be easily removable for service access.
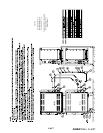
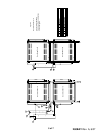
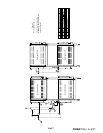
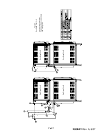
18. Install the flue assembly as shown in Figure 3.
a. Attach the flue adapter (Figure 4, 5, 6, Item 20) to the unit as shown in Figure 4, 5, and 6.
b. Attach the flue riser (Figure 4, 5, 6, Item 21) to the flue adapter as shown in Figure 4, 5, and 6.
c. Attach the flue adapter cover (Figure 4, 5, 6, Item 16) to the flue cover of the bottom steamer as shown
in Figure 4, 5, and 6.
d. Slide the rear flue cover (Figure 4, 5, 6, Item 17) over the flue riser assembly (Figure 4, 5, 6, Item 21).
e. Secure the rear flue cover to the flue riser assembly with two screws on each side.
19. Complete the installation of the steamers as outlined in the SteamChef Installation Manual,
P/N 22CGT-INM and Operator’s Manual, 22CGT-OPM.
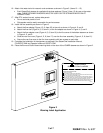
20. Place the Burn and Scald Hazard warning label on the door of the LOWER steamer as shown in Figure 2.