


Percussion
Recording/Reinforcement:
• Place a CM-700 about 1 foot away.
• Tape a PZM on the musician’s shirt (see the Crown
Boundary Mic Application Guide).
Ambience
Recording:
• Place one or two PZMs on a distant wall, or on the
control-room window.
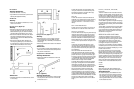
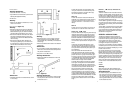
Grand piano (Figure 10):
Recording:
• Raise the lid. Tape a GLM-100 to the underside of
the lid in the middle. For stereo, use two over the
bass and treble strings. If you need more isolation,
close the lid. Boost a few dB at 10 kHz for clarity.
• Remove the lid. Place two CM-700s or CM-150s 8
inches over the bass and treble strings, 8 inches
horizontally from the hammers. Boost a few dB at
10kHz for clarity.
• Remove the lid. Place two GLM-100s about 12
inches apart, angled 90˚ apart, 18 inches over the
sound board and 10 inches horizontally from the
hammers. Boost a few dB at 10 kHz for clarity.
Reinforcement:
• Use GLMs inside with the lid closed. Boost at 10 kHz
for extra clarity.
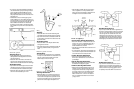
Upright Piano (Figure 11):
Recording:
• Remove the panel in front of the player to expose
the strings. Place two mics (CM-200A, CM-700,
CM-150, GLM-100, or GLM-200) over the bass and
treble strings.
• Mike the soundboard a few inches from the bass and
treble strings.
Reinforcement:
• For more isolation and gain-before-feedback, tape a
GLM-100 or two onto the sound board. Experiment
with position for best sound.
Xylophone and Marimba
Recording/Reinforcement:
• Place two CM-700s 18 inches above the instrument
and 2 feet apart.
Banjo (Figure12):
Recording/Reinforcement:
• Clip a GLM-UM Universal Mount to a banjo tension
rod, and position a GLM-100 1 inch from the head,
2 inches from the rim.
10
The CM-700 has a clear, natural sound. Self-noise
is very low, and the mic can handle extremely loud
sounds without distortion. A bass-tilt switch, pop
filter and windscreen are included.
CM-150
The CM-150 is a stand-mounted omnidirectional
condenser mic for measurements or studio recording.
Its ultra-flat response from 20 Hz to 20 kHz lets it
record any instrument – or an orchestra – with full
fidelity.
CM-10
The CM-10 is a mini omni lavalier mic. You clip it to
the users shirt or tie about 8 inches under the chin.
GLM-100, GLM-200
The Crown GLM offers all the quality and wide-range
response of larger studio microphones, yet is nearly
invisible in use. It can be attached to instruments or
performers, or hung over musical ensembles. No mic
stands are needed, which makes setup fast and easy.
Since the GLM is small, it can be mounted very close
to instruments to improve isolation and reject off-mic
sound.
Unlike larger microphones, GLMs pick up all sur-
rounding instruments with the same tone quality or
frequency response. That’s because the microphones
are very small and maintain their polar pattern up to
high frequencies.
Two main models of GLMs are available: The
GLM-100 and the GLM-200. The GLM-100 has an
omnidirectional or all around pickup pattern. When
placed in the center of a group of instruments (say, a
drum set), it picks up all the instruments surrounding
it. The GLM-200 has a hypercardioid pickup pattern.
It picks up mainly what it’s aimed at, and provides
excellent isolation and gain-before-feedback.
The GLM-100 has a deeper low-frequency response
and a higher overload point than the GLM-200. For
these reasons, the GLM-100 omni is the best choice
for low pitched instruments (bass, kick drum) and for
loud instruments. Also, the GLM-100 has less han-
dling noise and wind noise than the GLM-200.
General tips: For outdoor or vocal use, place the
included windscreen on the microphone to reduce
wind noise and breath popping. Although the cable is
rugged, excessive abuse such as tugging and twisting
will shorten its life. It should last indefinitely if treated
with care. The cable is short (8 feet) to allow easy
wrapping and to reduce the amount of thin cable on
stage.
LM-201, LM-300A, LM-300AL,
LM-301A
These four models are meant to be used on lecterns,
pulpits, or conference tables. The LM-201 has a noise-
free swivel mount. Designed for installation by sound
contractors, this model has a separate circuit module.
The microphone is shock mounted, and is meant to be
permanently screwed to the lectern top.
The LM-300A is a gooseneck microphone that plugs
into an XLR-type connector mounted in your lectern.
If shock mounting is necessary, order the LM-300SM
Shock Mount.
The LM-300AL is 5 inches longer than the LM-300A,
and has dual goosenecks for more-flexible position-
ing. The LM-301A has a collar which screws onto an
Atlas flange or mic stand. Its cable can exit inside or
outside the mounting device.
SPECIFIC APPLICATIONS
This section suggests some ways to place Crown
microphones to record or reinforce various musical
instruments. These are just starting points to reduce
the time spent experimenting. They work well in
many cases, but if you don’t like the results, feel free
to change the microphone or its placement.
If pick up of room reverbation, leakage, or feedback
is excessive, place the mic closer than recommended
below, and roll off the bass if necessary at your mixer
to obtain a natural timbre.
For example, suppose you’re miking a folk singer
playing a guitar. If you want to control the balance
between voice and guitar with mixer volume controls,
you must mike the singer and guitar separately and
up close to isolate their sounds. This placement often
results in bassy tone quality, so you’ll have to roll off
some bass at your mixer until the sound is natural.
Many of the techniques suggested here apply when
the instrument or voice is recorded alone, as for an
overdub.
Vocal
Recording:
Place a CM-700 or CM-150 8 inches away at eye
height to avoid breath pops. Use the foam pop filter.
Sound Reinforcement:
• For best sound quality, use a CM-200A not more
than 3 inches from the mouth. Place the included
foam pop filter on the mic. The closer the mic is to
your mouth the greater the gain-before-feedback,
and the greater the bass. Aim the mic at the nose to
avoid a “closed nose” effect.
7