


• For maximum gain-before-feedback and isolation,
use a CM-310A with your lips touching the metal
grille. The CM-310A Differoid® has more gain-
before-feedback than any mic you can buy, so it
really helps vocals stand out over a loud instrumen-
tal background.
• Vocalists who move around while playing often
prefer a headworn mic. An excellent choice for this
is the Crown CM-311A. It is worn with lips touching
the microphone, and offers extremely high gain-
before-feedback and isolation. For less critical
situations, use a CM-312A. It is smaller and lighter
than the CM-311A, and the mic is at the side of the
mouth.
Sax (Figure 5):
Recording:
• Place a CM-700 or CM-150 18 inches away, a few
inches above the bell, toward the player’s right side.
• Clip a GLM-UM to the bell, and attach a GLM-100
to the clip about 4 inches from the bell so that it can
see the tone holes.
Sound Reinforcement:
• Place a CM-200A or CM-700 just above the bell,
aiming at the tone holes.
• Clip a GLM-UM to the bell, and attach a GLM-100
to the clip just above the ball, aiming at the tone
holes.
Electric guitar or bass
Recorded Direct:
• For a clean sound, plug directly into an unbalanced
line input or use a direct box. For a distorted sound,
plug into a guitar signal processor (such as the
Rockman™), then into a mixer input.
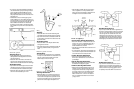
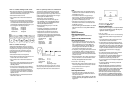
Electric guitar amp (Figure 6):
Recording/Reinforcement:
• Place a CM-200A 1 to 12 inches from the center of
one of the speaker cones. For more bass, place the
mic close. For the brightest tone, place the mic near
the center of the speaker cone. For a mellower tone,
place the mic near the edge of the speaker cone.
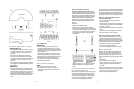
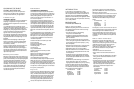
Drum set (Figure 7):
Toms and Snare, Recording/Reinforcement:
• Place a CM-700 about 1 inch above the head, 1 to 2
inches in from the rim, angled down about 45˚. If
the drum rings too much, tape some gauze or a
folded handkerchief to the head.
• Clip a GLM-UM Universal Mount to each drum rim.
Use GLM-200s.
• For more isolation, tape a GLM-100 inside each tom-
tom on the shell, or place a CM-700 inside each tom-
tom a few inches from the head, off center.
Cymbals, Recording/Reinforcement:
• Use one or two boom stands with CM-700,
GLM-100, or GLM-200 mics 1 to 3 feet over the
cymbal edges.
High-Hat, Recording/Reinforcement:
• Place a CM-700 with low-end roll off or GLM-200
8 inches above the edge aiming down.
Kick Drum, Recording/Reinforcement:
• Remove the front head and damp the kick-drum
head with a pillow or blanket. Drop a GLM-100
through the vent hole so that it hangs inside the
drum a few inches in front of the beater. Tape the
GLM cable to the kick-drum shell. Use a wood
beater or boost 2 kHz - 5 kHz for more attack or
click. Cut a few dB around 400 Hz to remove the
“papery” sound.
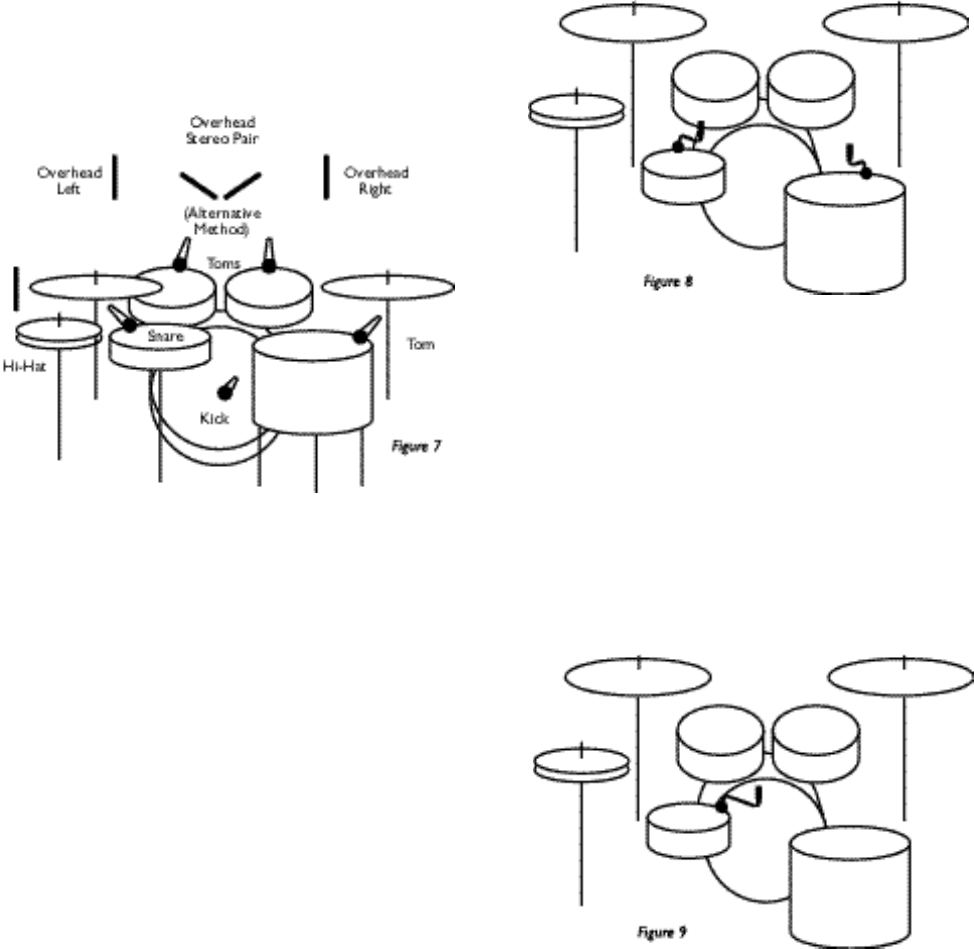
Three Microphones (Figure 8):
• Tape or clip one GLM-100 near the right side of the
snare drum. This GLM picks up the hi-hat, snare, left
rack tom, and cymbals. Tape or clip another GLM
near the right rack tom and the floor toms. This
GLM picks up the right rack tom, floor tom, and
cymbals. Experiment with placement to achieve a
good balance. You may want to boost the bass and
treble slightly. Put another GLM in the kick drum.
Two Microphones (Figure 9):
• Clip one GLM-100 to the snare drum rim, and
position the mic in the center of the set, about 4”
above the snare drum. With a little bass and treble
boost, the sound is surprisingly good for such a
simple setup. Put another GLM in the kick drum.
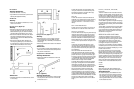
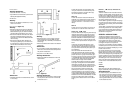
Acoustic guitar
Recordings (Figure 4):
• Attach a GLM-100 to the guitar sound board,
halfway between the bridge and the sound hole,
near the low E string.
• Place a CM-700 or CM-150 6 to 12 inches from
where the finger board joins the body. For stereo,
add another mic the same distance from the bridge.
Sound Reinforcement:
• Tape a GLM-100 inside the guitar onto the surface
nearest the performer, so that the mic can see the
sound hole. Equalize for the desired tone quality.
• Place a CM-700 a few inches from the sound hole
and roll off the excess bass at your mixer.
• Tape the cable of a GLM-100 to the grille cloth in
front of a speaker cone. A mic placement at the
center of the cone sounds bright; a placement near
the edge of the cone sounds more mellow.
8 9