


fender.com
7
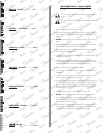
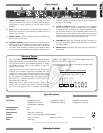
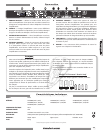
Specifications
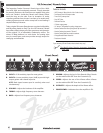
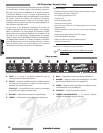
Rear Panel
TYPE: PR 770
PART NUMBERS: 2172000000 (120V~, 60Hz) 2172001000 (110V~, 60Hz) TW 2172003000 (240V~, 50Hz) AUS
2172004000 (230V~, 50Hz) UK 2172005000 (220V~, 50Hz) ARG 2172006000 (230V~, 50Hz) EUR
2172007000 (100V~, 50/60Hz) JPN
POWER REQUIREMENT: 125W
INPUT IMPEDANCE: 1MΩ
POWER AMP OUTPUT: 15W into 8Ω @ < 10% THD, 1kHz
SPEAKERS: One 8Ω, 10", Jensen Special Design C-10R, (P/N 0069347000)
DIMENSIONS: Height: 16 in (40.6 cm) Width: 19 7/8 in (50.5 cm) Depth: 9 1/2 in (24.1 cm)
WEIGHT: 28 lb (61.6 kg)
Product specifications are subject to change without notice.
Your new Fender® amplifier comes equipped with the highest
quality tubes available, sourced from various manufacturers all
over the world. Because of occasional irregularities in supply,
the specific tube type used in each amplifier is subject to
change without notice.
When replacing output tubes, please note the specific tube
markings on the original tubes factory supplied with your
amplifier. For example, 6L6 output tube types used by Fender
include, but are not limited to: 6L6GC; 6L6WXT; 6L6C; 6L6GE;
etc. The installation of a different type may require significant
adjustment by a qualified technician to avoid reduction in
performance and tube life.
Additionally, Groove Tubes™ sorts and tests many of our
output tubes, and paints them with a color-coded label. If
your amp came supplied with, for example, White-labeled
6L6WXT tubes, then a new set of White 6L6WXT tubes will
be the perfect direct replacement.
If you have questions or concerns, contact your Fender dealer
or authorized service center.
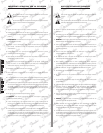
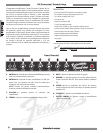
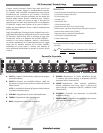
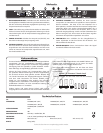
Model "65 Princeton® Reverb Amp"
Tube locations left to right at rear:
Vacuum Tubes
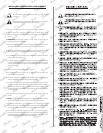
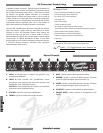
J. POWER CORD SOCKETConnect to a grounded A/C outlet
using the supplied power cord, in accordance with the voltage
and frequency ratings specified on the rear panel of your
amplifier.
K. FUSE
Protects the amplifier from electrical faults. Replace a
blown fuse only with the type and rating specified on the rear
panel of your amplifier.
L. POWER SWITCH
Turns the amplifier ON-OFF as indicated by
the front panel power jewel.
M. INTERNAL SPEAKER
Plug-in connection for the internal
speaker. A speaker must always be connected at this jack when
the amplifier is ON. A speaker impedance load of should
be used to avoid distortion or damage to the amplifier. When
using only the internal speaker jack, a speaker impedance load
of ohms (minimum) should be used to avoid distortion or
damage to the amplifier.
N. EXTERNAL SPEAKER
Plug-in connection for an external
speaker. This jack is wired in parallel with the INTERNAL
SPEAKER JACK {M} and affects the speaker impedance load.
Use minimum total. To use the external speaker output, first
disconnect the internal speaker. Then connect a speaker
load (minimum) to the internal speaker jack and another
speaker load (minimum) the external speaker jack.
O. FOOTSWITCH
Plug the (included) -button footswitch in
here. The footswitch enables remote switching of the Reverb
and Vibrato effects.
P. REVERB JACKS
RCA jacks that route signal to and from the
Reverb tank.