


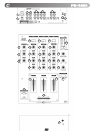


Use the Toggle switch for CH 1 through CH 3 to assign the
CH(s) to be monitored in your headphones.
Use the face panel located rotary CUE VOLUME CONTROL
(17) to adjust the CUE volume without changing the overall mix.
By turning the face panel located CUE/MIX/PGM ROTARY
CONTROL (18) counter clockwise you will be able to monitor
the assigned cue signal. Slowly turning the control clockwise to
middle position allows you to monitor CUE MIX with PGM.
Moving the control clockwise to the right allows you to monitor
PGM (Main) output.
6. CROSS FADER SECTION: The CROSS FADER (19) allows
you to mix from one source to another. The CROSS FADER (19)
in your unit is removable and if the need arises can be easily
replaced. Your Gemini mixer comes with an RG-45 (RAIL
GLIDE™) DUAL-RAIL CROSS FADER, which has internal dual
stainless steel rails that allow the slider to ride smoothly and
accurately from end to end, and a special mix curve. There are
also CURVE and REVERSE controls (20) controls located on
the front panel for adjusting the speed in which the audio comes
in on each side of the crossfader and the direction each channel
comes in from. Also available is our RG-45 Pro (RAIL GLIDE™)
DUAL-RAIL CROSS FADER. This unique CROSS FADER fea-
tures, a lighter feel and faster curve specially made for scratch-
ing. Just purchase one from your Gemini dealer and follow the
instructions:
NOTE: DO NOT APPLY PRESSURE WHILE USING THE CROSS FADER (19).
LIGHTLY GLIDE THE CROSSFADER BACK AND FORTH. PRESSING DOWN
ON THE CONTROLS CAN BEND CONTACTS AND CAUSE A LOSS OF
SOUND.
7. OUTPUT SELECTION CONTROL: Once you are comfort-
able with the sound level of your music you may adjust the vol-
ume with the MASTER (21) rotary control.
8. MIC SECTION: Plug your main MIC into the MIC 1/4" input
(6) located on the rear panel. You can use the Mic Gain Control
(22) as well as the HIGH (23) and LOW (24) controls to adjust
the volume and tone of the microphone signal
9. VU METER: The PS-626x has a dual mode VU METER (25)
that allows you to monitor the decibel levels of CUE and PGM or
LEFT and RIGHT stereo levels of the MASTER output. With the
VU MODE SWITCH (26) you may monitor the output level of the
CUE when the switch is Left.. Or you can monitor the LEFT and
RIGHT stereo decibel levels of the MASTER OUTPUT when the
switch is in the RIGHT position.
10:”Ipod Friendly” Cable:To connect your Ipod or other Digital
Media Player, use the included Ipod cable. Connect the 1/8’’ end
of the cable to the headphone or line out jack of your player, and
connect the RCA end to the line input (7) of your mixer.
INPUTS:
Phono..................................................................3 mV, 47 KOhm
Line.................................................................150 mV, 27 KOhm
MIC…………..........……….................1.5 mV, 1 KOhm Balanced
OUTPUTS:
Max.................................................................20V Peak-to-Peak
Rec....................................................................225 mV, 5 KOhm
GENERAL:
Frequency Response................................20Hz - 20KHz +/- 2 dB
Distortion.........................................................................< 0.02%
S/N Ratio.........................................................Better Than 85 dB
Headphone Impedance...................................................16 Ohm
Power Source (external)...........................AC 15v 500 mA
Unit Dimensions..............................................10" x 3.3" x 12"
…………………………………………….....(254 x 84 x 307 mm)
Weight...............................................................6.27 lbs (2.85 kg)
SPECIFICATIONS SUBJECT TO CHANGE WITHOUT NOTIFICATION FOR
IMPROVEMENT.
SPECIFICATIONS:
REPLACEABLE CROSS FADER
1. UNSCREW THE OUTSIDE FACE PLATE SCREWS ON THE LOWER HALF OF
THE MIXER. REMOVE THE FADER CAPS AND FACE PLATE.
2.UNSCREW THE FADER (B)
SCREWS. DO NOT TOUCH INSIDE
SCREWS (C). CAREFULLY
REMOVE OLD CROSS FADER AND
UNPLUG CABLE (D).
3. PLUG IN THE NEW CROSS
FADER INTO CABLE (D) AND
PLACE BACK INTO MIXER.
4. SCREW THE CROSS FADER TO
MIXER WITH THE FADER PLATE
SCREWS (B).
5. REPLACE THE LOWER HALF
FACE PLATE AND SCREW TO THE
MIXER.