


H8069 Heirloom Stratocaster-Style Guitar Kit
-11-
NOTICE
Dust particles suspended in the air will
settle on wet finishes, causing less than sat
-
isfactory results. To avoid this problem
:
• Leave the finishing room undisturbed
for 24 hours prior to applying the fin
-
ish.
• Avoid making unnecessary movements
when entering the finish room.
• Apply the finish to the desired guitar
parts and immediately leave the finish
room. DO NOT return to the room until
the specified drying time has elapsed.
5. Apply several thin coats of the finish, follow-
ing the manufacturer's instructions. Multiple
thin coats usually produce a better quality
finish than one heavy coat.
6. Dry sand the entire body with #400 grit wet/
dry sandpaper after at least three coats of fin
-
ish have been applied. DO NOT sand through
the finish—be careful on the edges.
7. Use a tack cloth to remove sanding residue.
8. Apply more finish, sanding between coats,
until the finish is the desired thickness.
Note: If finishing with a solid color, you may
wish to apply several coats of a clear finish
over the top, sanding between coats, to add
depth to the finish.
9. When the final coat has dried at least a week,
preferably a month, remove the temporary
handle and masking.
10
. Wet sand the finish using #600 grit wet/dry
sandpaper with a sanding block, followed
with #1000 grit wet/dry sandpaper.
11. Use a clean, absorbent rag to remove excess
water. Let the guitar dry completely, then use
a tack cloth to remove all residue.
12
. Buff the finish by hand or with a buffer, start-
ing with a medium polish and working up to a
high gloss polish.
Note: If you use a buffing machine, be care-
ful to avoid going through the finish, espe
-
cially on the edges.
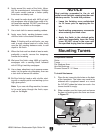
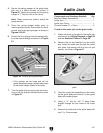
Mounting Tuners
Components Needed Qty
Guitar ................................................................. 1
Tuners ............................................................... 6
Flat Washers 8mm ............................................
6
Hex Nut Bushings ..............................................
6
Chrome Screws 2.1 X 14mm ............................ 6
To install the tuners:
1. Place the six tuners into the holes on the back
of the headstock. The holes may need to be
widened with a peghead reamer or a round
file. DO NOT widen the holes too much—the
tuners should fit snugly.
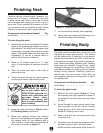
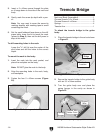
2. Slide a washer over the tuner post and screw
the hex nut bushing onto the tuner as shown
in Figure 12.
Figure 12. Threading hex nut bushing onto
tuner.
Tuner Post
Washer
Hex Nut
Bushing