


H3124 Banjo Kit -7-
Finishing supplies are not included with the banjo
kit. Note—The wooden rim and neck are made of
mahagony wood. Clear finishes such as lacquer
look exceptionally stunning and glossy on this
wood.
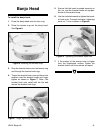
To finish the wooden rim:
1. Wear a NOISH/OSHA approved respirator
with particulate and gas/vapor filters,
safety glasses, and rubber gloves, when
using finishing materials!
2. Always work in a well ventilated area
when using finishing materials.
3. Thread a long shank screw eye into one of
the holes in the wooden rim.
4. Hold the screw eye and apply several thin
coats of the finish. Multiple thin coats usually
produce a nicer finish than one heavy coat.
Note—Always follow the finish manufactur-
er’s instructions.
5. Hang the wooden rim to dry.
Painting/Finishing Tips:
Dust particles suspended in the air will settle on
wet finishes, causing less than satisfactory
results. To avoid this problem:
• Leave the finishing room undisturbed for 24
hours prior to applying the finish.
• Avoid making unnecessary movements upon
entering the finish room.
• Apply the finish to the desired banjo parts and
immediately leave the finish room.
• DO NOT return to the room until the specified
drying time has elapsed.
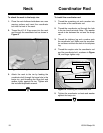
To finish the neck:
1. Wear an NOISH/OSHA approved respira-
tor with particulate and gas/vapor filters,
safety glasses, and rubber gloves, when
using finishing materials!
2. Always work in a well ventilated area
when using finishing materials.
3. Mask off the fretboard. Use a small stick of
wood to carefully press all the masking tape
edges securely to the banjo fretboard. The
finish coat can seep under these edges,
especially near corners, uneven edges, and
places where the frets meet the fingerboard.
4. Form a piece of wire into a U shaped hanger
with hooks on both ends.
5. Thread the hooks through the upper peg-
holes and hang the neck in the finish room.
6. Apply several thin coats of the finish. Multiple
thin coats usually produce a nicer finish than
one heavy coat. Note—Always follow the fin-
ish manufacturer’s instructions.
7. Hang the neck in a dust free room to dry.
8. When finishing is complete, remove the
masking tape from the fretboard.
9. Carefully scrape any excess finish off the
fretboard with a razor blade.
NeckWooden Rim
SECTION 5: FINISHING