


Setting up
34 DMS 70
DMS 70DMS 70
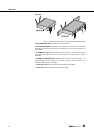
DMS 70 Quattro/Dual
When delivered, the transmitters are preconfigured to channels 1 and 2 of the receiver.
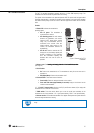
Use the identification function to check
the channel on the receiver assigned for a transmitter and
the connected transmitter for a channel on the receiver.
Press Connect (16) briefly on the transmitter or the receiver.
The status LEDs (13) on the same channel of the transmitter and receiver flash
green.
NOTE
This identification function can also be used during operation without causing any disturbance
or interruption.
The following instructions apply for the assignment of a free channel and for changing a
channel.
Actions 3 and 4 can be started from the transmitter and receiver. In this example, they are
started from the receiver.
1) Pull the battery compartment cover (14 / 22) down and off the transmitter.
2) Switch on the transmitter and receiver.
3) Press Connect (3) on a free channel of the receiver and hold down until the status LED
(5) starts to flash after approximately 2 seconds.
You need to confirm with the transmitter within the next 30 seconds.
4) Hold down Connect (16) on the transmitter until the status LED (13) lights up green.
The status LEDs on the transmitter (13) and the receiver (5) light up green once
assignment has been successful.
NOTE
The actuated settings are saved. This means that you can simply continue using the DNS 70
system with the last-used settings (channel assignments) the next time you switch on.
NOTE
Dual channel use is not possible with the DMS70 system.
I.e. several transmitters can't be assigned to a single channel on the receiver. The LED on the
connected transmitter lits green, the LED on the transmitter, which is not connected, flashes
green. Please assign this transmitter to a free channel on the receiver.
Take care that you do not use a channel twice.
Start the registration process with the transmitter: Transmitter -> Receiver
1) Pull the battery compartment cover (14 / 22) down and off the transmitter.
2) Switch on the receiver.
3) Press and hold Connect (16) on the transmitter while pressing the on/off button(15)
until the status LED (13) starts to flash.
Within the next 30 seconds, the status LED (13) flashes rapidly and you need to
confirm with the receiver.
4) Hold down Connect (3) on a free channel of the receiver until the status LED (5) lights
up green.
The status LEDs on the transmitter (13) and the receiver (5) light up green after
successful registration.
Identifying the channel and/or appliance
Assign the transmitter to a free channel or
change the channel
Registering a new transmitter on the
receiver