


9
ZENAMP-MANUAL
ENGLISH
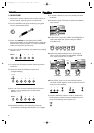
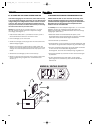
4.3 JACKS AND CONTROL FEATURES IN DETAIL
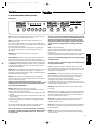
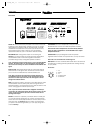
FRONT PANEL
INPUT: Connect your electric guitar or pick-up-equipped acoustic
guitar to this input (it accepts all input levels).
GAIN: This knob serves different purposes depending on the
selected amp type:
Some of the original models (BLACK FACE, TWEED DELUXE) don't
come with a master volume. For this breed of amp, GAIN responds
just like a regular volume knob.
For models that are equipped with both gain and master knob,
the GAIN knob serves the same purpose as the gain knob on
the original.
AMP TYPE: Rotate this knob to select from among the
16 amp types.
TONE CONTROLS: BASS, MID, TREBLE and PRESENCE knobs. These
knobs work like those on the original amp and their response
depends on the amp type that you have selected. Because some
of the original amps don't have a presence knob or a 3-band EQ,
the zenAmp's knobs are assigned special functions to replicate all
of the originals' tweaking options (for an in-depth explanation of
this, see 2.0 AMP MODELS).
PRESET VOL: Controls preset volume. Unlike the setting of the power
amp MASTER knob located on the far right, you can store this
parameter. This handy feature lets you dial in the desired balance
of the relative levels for all presets.
MANUAL: Press this button to activate Manual mode (see also
section 4.2 above). The current settings of all knobs are enabled –
what you see is what you hear.
Heads up, though! The MANUAL button also lets you switch
between the sound banks of the zenAmp manually when you press
and hold it down for a bit. To learn more about this, please read
the next section entitled PRESETS.
PRESETS 1 to 5: These knobs perform two functions:
For one, they are used to call up stored user presets and factory
presets. To this end, proceed as follows:
1) Activate the five presets of a sound bank by pressing the Preset
buttons.
2) To switch sound banks, press and hold the MANUAL button until
it starts flashing.
3) Select the sound bank by pressing one of the PRESET buttons
4) Activate the presets 1 to 5 of this bank by pressing the PRESET
buttons again.
For the other, these buttons serve to store new presets. To learn
more about this, read the following section entitled STORE.
Note: On the zenAmp, you can call up 30 presets - including five
user presets - manually. The optionally available Z-Board increases
the number of manually accessible presets to 125, 100 of which
are user presets.
Note also: To go from the sound banks holding the factory presets
back to the five user presets, briefly press the MANUAL button. This
switches the zenAmp to Manual mode (see section 4.2 above).
Briefly press the MANUAL button again to switch to Preset mode,
which lets you access the user presets. The optional Z-Board is of
course a far more convenient option for switching modes and
presets.
STORE: It saves preset settings.
Here’s how this works: Press the STORE button. It lights up red.
Select the desired memory slot by pressing one of the PRESET
buttons 1 to 5.
The preset is stored when you press STORE again. This overwrites the
preset that was previously stored in the selected memory slot.
Note: You can cancel the storage process at any time by pressing
the MANUAL button.
Note also: You can of course also navigate to the desired memory
slot via the optional Z-Board.
FX TYPE: This selector puts eight modulation effects, seven pre
effects (meaning effects that plug into the front end of the amp)
such as wah-wah, and a bypass at your fingertips. Simply turn the
rotary selector to select effects.
FX PARAMETER: Controls the parameters of the effect that you
select using the FX TYPE knob. Since most of the effects offer at
least two parameters, this knob actually gives you musically
meaningful combinations of these parameters.
Case in point: Say you select the chorus effect. When the
FX PARAMETER knob is set to a low value, the chorus’ rate is low,
but its intensity or amount is high. As you turn the knob up, the rate
increases while intensity decreases.
REVERB VOL: It determines the amount of reverb that is added
to the signal.
TAP: This button lets you enter in delay time manually. Simply tap in
the desired tempo. The zenAmp gauges the time between taps
and synchronizes the delay accordingly. TAP will of course only
work when a delay effect is active.
DELAY TYPE: Turn this rotary selector to choose from among the
16 different delay effects. This effects section can also be
bypassed (see DELAY VOL).
DELAY VOL: It controls the volume of the delay effect selected via
DELAY TYPE. The delay effect is bypassed when the knob is set to
the far left position.
MASTER: It controls the overall volume level of the power amp.
This knob is global, meaning that it affects all presets. Its setting
cannot be stored.
INPUT REVERB VOL MASTERFX PARAMETER DELAY VOL
MANUAL 1 2 3 4 5 STORE
TAP
PRESETS
POWER
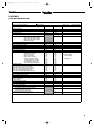
BRIT HI GAIN
-5 +5 -5 +5 -5 +5 -5 +5 0 10 0 10
0
5
10
GAIN BASS MID TREBLE PRESENCE PRESET VOL
0
5
10 0
5
10
MID BOOST
WAH WAH 1
BYPASS
TAPE ECHO REPEAT
STEREO REPEAT
HALLO SPACE
TAPE ECHO SPACE
TAPE MULTI DRY
HALLO REPEAT
HALLO DRY
TAPE MULTI REPEAT
TAPE SPACE
PING PONG
TAPE ECHO DRY
ECHO REPEAT
STEREO SPACE
LOOP-O-TAP
ECHO DRY
STEREO LOOP-O-TAP
FUZZ
PHASER
CHORUS STEREO
T-SCREAMER
CHORUS MONO
STROBE
COMPRESSOR
TREMOLO
PHASER XL
WAH WAH 2
FLANGER MONO
FLANGER STEREO
MOD WAH
zenAmp
TWEED DELUXE
HOT PLEXI
TWEED 4 x 10
BRIT CLASS A
PLEXI 100
PLEXI 50
HOT CLASS A
CALIFORNIA HOT
BRIT ULTRA GAIN
BLACK FACE
JC CLEAN
RECTIFIED
WARP
JAZZ CLEAN
ACOUSTIC
DYNAMIC SECTOR MODELING GUITAR AMP
TM
ZenAmp_BDA_1.5 26.11.2001 16:07 Uhr Seite 9