


Page
65
APPENDICES
7
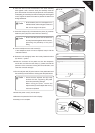
6. Place the stand so that the backside of the stand assembly
rests against a wall, and then slowly and carefully insert the
piano. Ensure that more than two people work on the assembly.
If attempting to insert the piano without resting the stand against
a wall, support the back of the stand to prevent the stand from
sliding backwards.
7. Press the end panel (C) of the stand to the piano (A), and then
fasten the piano (A) to the stand with four screws (I).
8. Fix the headphone hook and screws (K).
* If the headphone hook will not be required, keep it with the
instruction manual.
9. Raise the unit and tightly fasten the loosely fastened screws
(H) with the * symbol.
10
. Insert the connector of the pedal cord into the receptacle,
and fi x the cord with the cord clamp (J) (make sure that the
protrusion of the connector is facing the correct direction, and
insert the connector straight).
11
. Turn the adjustor bolt (E) at the bottom of the pedal stand until
the bolt fi rmly touches the fl oor and supports the pedal board.
12
. Insert the power cord (L) into the piano.
13
. Remove the protective fi lm from the display.
Assembly is now complete.
Caution
y Ensure that the piano is not dropped on an
individual’s feet, and that fi ngers, hands and
feet are not caught in the piano.
Caution
y Ensure that the piano and the stand are
securely fastened together with the screws,
preventing the possibility of the piano
falling.
Caution
y Ensure that the adjuster bolt (E) fi rmly
touches the fl oor, supporting the pedal
board and preventing damage.
When moving the piano, remove the
adjustor bold (E) and readjust after moving
has been completed.
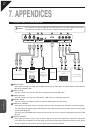
11
(E)
12
(L)
9 y 10
(J)(J)
(H)*
Protrusion
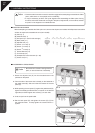
13
6 y 7 y 8
(A)
(K)
(I)
(I)