


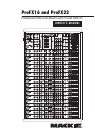

Owner's Manual 3
Part No. SW0898 Rev. C 05/11
©2011 LOUD Technologies Inc. All Rights Reserved.
Hey buddy, why are you reading this? It's an A-B
conversation. Why don't you C your way out of it?
3. Be sure that the volume of the input is the
same as it would be during normal use, or you
may have to readjust the gain in the middle of a
set. You can listen with headphones if you
carefully turn up the channel fader and
headphones level a little.
4. The mono channel gain affects the mic and the
line inputs. The stereo channel gain adjusts the
stereo line inputs. Adjust as desired, and make
sure that the OL LED does not come on during
the loudest passages.
Note: there are two hybrid channels [9/10 and
11/12 on the ProFX16 and 15/16 and 17/18 on
the ProFX22] that have both mono mic and
stereo line inputs. In these channels, the gain
control affects only the mic gain.
5. Repeat steps 1 to 4 for the other channels.
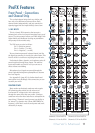
Instant Mixing
1.
To get sound out of the speakers and into a
waiting world, engage a channel's L-R assign
switch, turn up that channel’s fader to the “U”
(unity gain) position,
and slowly bring up the
main fader
to a comfortable listening level.
2. Sing and play. You’re a star!
3. Bring in other channels as mentioned above.
USB
The USB connection allows you to play two channels
of audio from your computer, and to record the main
mix to your computer. This feature is explained more
thoroughly on pages 4, 9-10, 16 and 23.
Notes
For optimum sonic performance, the channel faders
and main fader should be set near the “U” (unity gain)
markings.
Turn down all faders before making connections to
and from your ProFX mixer.
When shutting down the system, turn off amplifiers or
powered speakers first. When powering up, turn them
on last. This will prevent the possibility of turn-on and
turn-off thumps heard in your speakers.
Save the shipping box and receipt! You may need
them someday.
Read This Page!
You probably want to try out your new
mixer right away. Before you do, please
read the safety instructions on page 2,
then read this page, and the rest later.
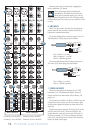
Zero the Mixer
1. Turn down all knobs except the channel EQ and
pan knobs, and set all the faders fully down.
2. Set all channel EQ knobs, pan knobs, and the
graphic EQ sliders at their center detent.
3. Set all buttons to the “out” position.
4. Whistle a popular show tune.
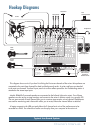
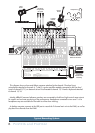
Connections
If you already know how you want to connect the
mixer, go ahead and connect the inputs and outputs
the way you want them. If you just want to get sound
through the mixer, follow these steps:
1.
Plug signal sources into the mixer, such as:
• Microphonespluggedintothemicinputs.
Engage phantom power if your mics need
it. Check the mic's user manual to be sure.
• Line-levelsourcessuchaskeyboards,drum
machines, or CD players plugged into the
line-level inputs.
2
. Connect cords from the main outs to your
powered speakers or amplifier.
3. Plug in the mixer’s power cord to a live AC
outlet and turn on the mixer.
4. If you have powered speakers, turn them on.
Otherwise, hook up your passive speakers to
your amp with speaker cables, and turn it on.
Adjust your powered speaker or amplifier level
controls to however the
manufacturer
recommends. (This is usually all the way up.)
Set the Gain
1. Plug something into an input. This could be an
instrument, you singing or speaking, or a line
level source such as a keyboard or CD player.
2. Engage the channel's PFL Solo switch to view
the input level via the main meters.