


|
5
KeyRig 25 User Guide
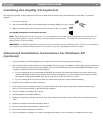
Installing the KeyRig 25 keyboard
Your KeyRig 25 controller is class-compliant and requires no additional drivers when used under Windows XP or Mac OS X. To install the
keyboard:
1. Turn on your computer.
2. Use the provided USB cable to connect KeyRig 25 to an available USB port on your computer.
3. Make sure that the power switch on the back of the controller is in the “on” position.
Your KeyRig 25 keyboard is now ready to be used.
NOTE: Advanced Windows XP users who plan to 1.) use the keyboard with more than one audio application at the same time, or 2.)
send long SysEx (system exclusive) commands, must install special multi-client driver. The installation process is described in the
following section of this User Guide.
IMPORTANT: The KeyRig 25 keyboard is “bus-powered” by your computer through the USB connection. Only use a power adapter if
your computer cannot provide adequate power to the controller or if you are using KeyRig 25 without a computer.
Advanced Installation Instructions for Windows XP
(optional)
1. If you have already connected KeyRig 25 to your computer, disconnect it before beginning the installation.
2. We recommend that you download the most recent KeyRig 25 drivers by going to the Support > Drivers page at www.m-audio.com.
This ensures that you have the newest drivers available. If you do not have Internet access, insert the KeyRig 25 CD-ROM into your
computer to install the drivers that came with KeyRig 25.
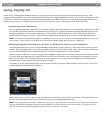
a. If you are installing drivers from the KeyRig 25 CD-ROM, the computer will automatically display the interactive install screen
when the CD-ROM is inserted. If your computer fails to launch this application, you can manually start it by clicking on Start >
My Computer > KeyRig 25 CD-ROM. Next, select your product from the menu and click “Install.”
b. If you are installing drivers from www.m-audio.com, double-click the file once it has finished downloading.
3. Follow the driver installer’s on-screen instructions.
4. At various points in this installation process, you may be notified that the driver being installed has not passed Windows Logo
Testing. Click “Continue Anyway” to proceed with the installation.
5. Once the installer has completed, click “Finish.”
6. Attach KeyRig 25 to an available USB port.
7. Windows will identify the controller and will ask if you want to search the Internet for a driver. Select “No, not this time” and press
“Next.”
8. Windows will display a “Found New Hardware” Wizard.
9. Choose “Install software automatically” and click “Next.”
10. Once the Wizard has completed, click “Finish.”
11. Once the installation is complete, you will see a message pop up stating, “Your new hardware is installed and ready to use.”