5
INSTALLATION
To ensure years of enjoyment from your NADY AUDIO PRM-400 powered mixer console, please read this manual thoroughly
before using the unit.
1. INSPECTION
Your NADY AUDIO PRM-400 was carefully packed at the factory in packaging designed to protect the units in shipment.
Before installing and using your unit, carefully examine the packaging and all contents for any signs of physical damage that
may have occurred in transit.
[Please note: Nady Systems is not responsible for shipping damage. If your unit is damaged, do not return to Nady, but
notify your dealer and the shipping company (if shipped to you) immediately to make a claim. Such claims must be made by
the consignee in a timely manner.]
2. RACK MOUNTING
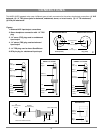
Enclosed in the shipping box you will find a rackmount kit. If you want to make your PRM-400 a rack mixer, remove the
screws from the side panels and use them to attach the rack ears.
(Note: The rack ears are supplied as “left” and “right” and must be attached as such.)
3. SETUP AND OPERATION
Parts of the unit can become very warm during use. This is normal during operation. Care should be taken to ensure that
there is enough space around the unit for cooling (at least 12” or 30cm). Do not place the PRM-400 on high temperature
devices such as power amplifiers, etc., or the unit may overheat in operation. Also, do not place the unit on speakers as this
may cause them to move and/or fall due to speaker vibrations.
Although the unit’s chassis is shielded against radio frequency (RF) and electromagnetic interference (EMI), extremely high
fields of RF and EMI should be avoided.
The PRM-400 has an internal power supply and is designed to operate from an external AC source. Power requirements
for electrical equipment differ from area to area. Be sure to confirm that the voltage selected by the voltage selector switch
on the back panel is proper for your area (120VAC/60 Hz or 230VAC/50Hz) per the information below:
Europe (except UK): 230V, 50Hz
UK and Australia: 240V, 50Hz
USA and Canada: 120V, 60 Hz
For other areas, please check with local authorities.
When ready to operate, plug the AC cord into the power source. Make sure that the unit is turned off before connecting to
the AC power source to avoid possible loud transients which can damage your speakers or your ears, especially when mon-
itoring with headphones. Set the noted controls to the positions indicated below to further minimize the chance of undesired
noise when first powering up your PRM-400 :
LEVEL FADERS (11,27A,27B,28) ................................................................................................................SET TO MINIMUM
HI, MID & LOW EQ’S (6) AND PAN CONTROLS (9)..................................TURNED TO THE CENTER DETENT POSITION
AUX , EFF CONTROLS & PHONES LEVEL CONTROLS (7,8,36) ..........TURNED COMPLETELY COUNTERCLOCKWISE
ALL OTHER CONTROLS SHOULD ALSO BE TURNED COMPLETELY COUNTERCLOCKWISE.
Power up the unit as noted in Power Connections, Indicators, and Switches (Section 3e in CONTROLS AND
CONNECTIONS).


