DM1200/DM1235/DM1285
5
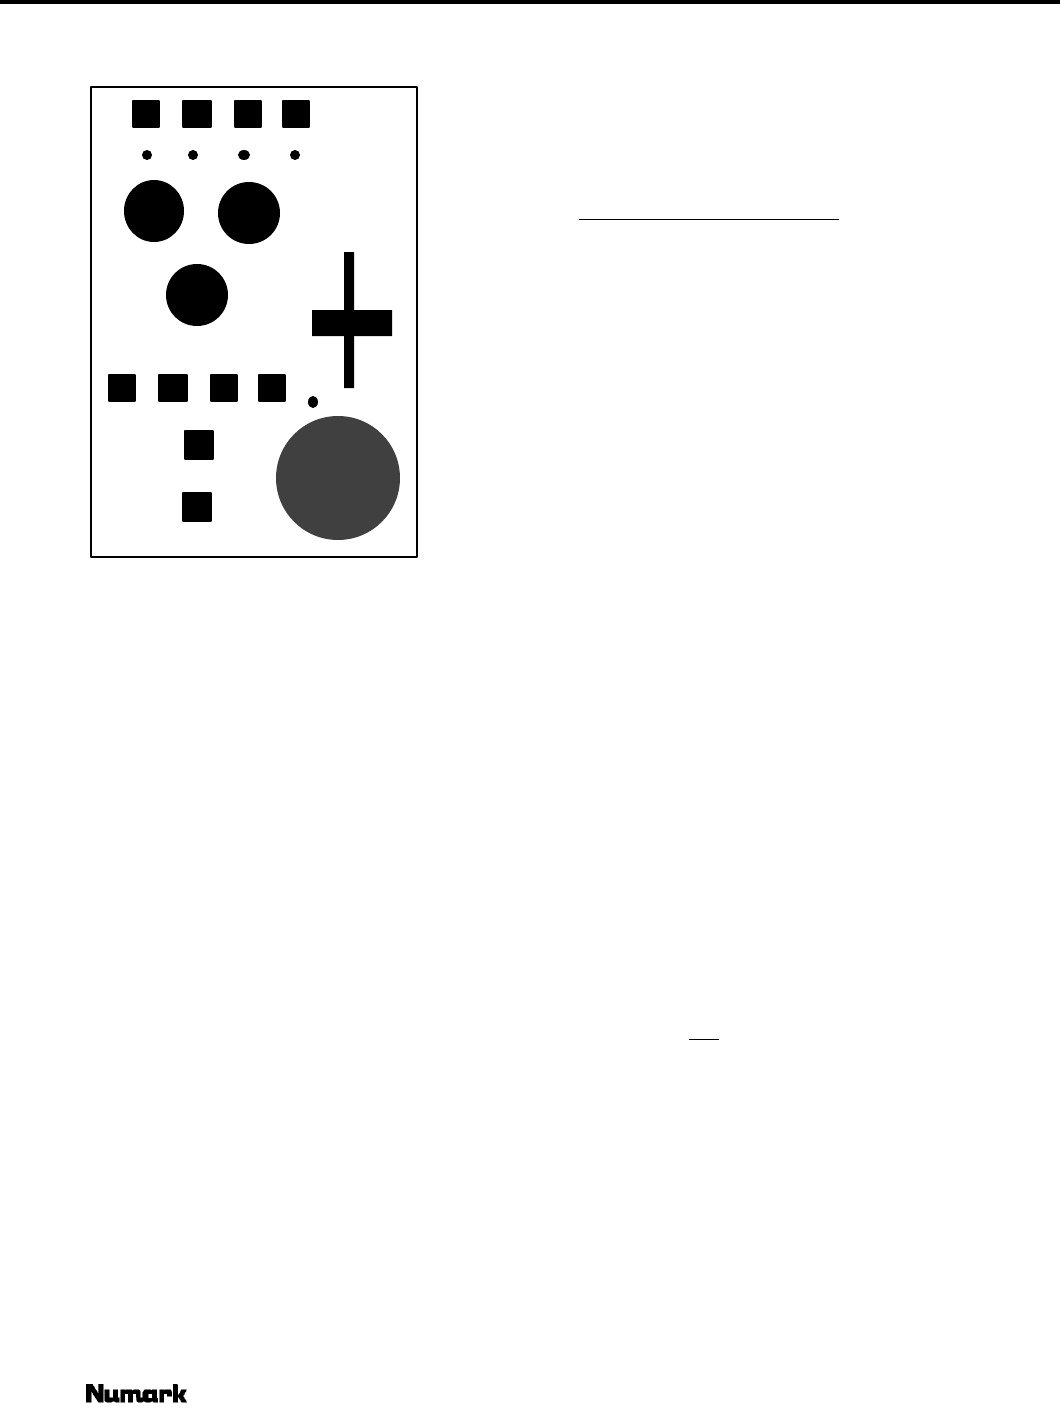
6
7
8
4
3
2
1
DM1285 with DIGITAL SAMPLER
The DM1285 Sampler uses dynamic RAM with a
16-bit microprocessor controller. The same digital
signal processing components used in professional
audio equipment deliver CD-quality samples.
1. The Mode Pushbuttons switch from effect to effect.
The accompanying LEDs illuminate to show you which
specific mode you are in at any time.
Modes are:
• Repeat sets the unit to play back a sample and
automatically repeat (loop) when it gets to the end of
the sample.
• Single sets the unit to play back a sample once.
• Edit sets the unit to sample edit. This activates the
Intro and Outro editing controls as described in #2.
Edit can be used at the same time as Single and
Repeat so that editing of the sample can be done
while your program output is playing on the dance floor.
• Write sets the unit to sampler record ready. After
selecting a bank, hit the Start/Stop button (#6) to
begin recording (it is safer to actually choose your bank
before going to write mode so that you don't
accidentally wipe out an existing sample). The LED will
stay lit while you are in Write mode. After you are done
writing your sample, you should select a play mode
(either Single or Loop) and listen to your sample - note
that you must do this manually by hitting the correct
Mode Pushbutton.
TO RECORD A SAMPLE
a - Press the Write button once to go into stand by
mode. The Red LED will go on.
b - Select the bank (or multiple banks) into which you
want to record. Any bank can be selected. Each bank
contains 3 seconds of recording time. If you want to
record a longer sample, select multiple banks (they
must be adjoining). To playback a multi-bank sample
you must reselect the same banks later. Note: To
overwrite an existing sample, select that bank instead
of an empty bank. Changing bank selection at this
point in time is possible and will not destroy any
previously recorded samples.
e - Hit the Start-Stop button to begin recording. Its
Red LED will light.
f - Hit Start-Stop a second time to stop the sampling, or
allow the memory banks to fill up, at which time
sampling will stop automatically. Once your writing is
complete, the sampler will automatically switch to
Single playback mode and light the Single LED. The
sampler is now ready for playback.
2. Intro and Outro editing controls are used when
Edit mode is selected to fine-tune the beginning
(Intro) or ending (Outro) of your samples. These
"trim" the unwanted sound while in Single or
Repeat playback modes. Turn the controls inward to
trim more - return them to their full outside position to
return to your full sample. Once trimmed, turn Edit off
to lock-in your settings. Now every time you select the
sample it will be the perfect length. Note: Trimmed
samples are not erased - they can be heard again by
going back into Edit and undoing the trim. This
powerful new feature allows you to start a sample early
or end it late and still trim it to the perfect length
without having to re-record. Since these controls can
be active while the sample is "live", you can even fine-
tune samples on the fly. A way of efficiently trimming
samples is by engaging the Stutter button and
repeatedly hitting the Start-Stop button as you
adjust the Intro knob.
Numark - The Leader in DJ Technology
©1998 Industries 14 http://www.numark.com


