4
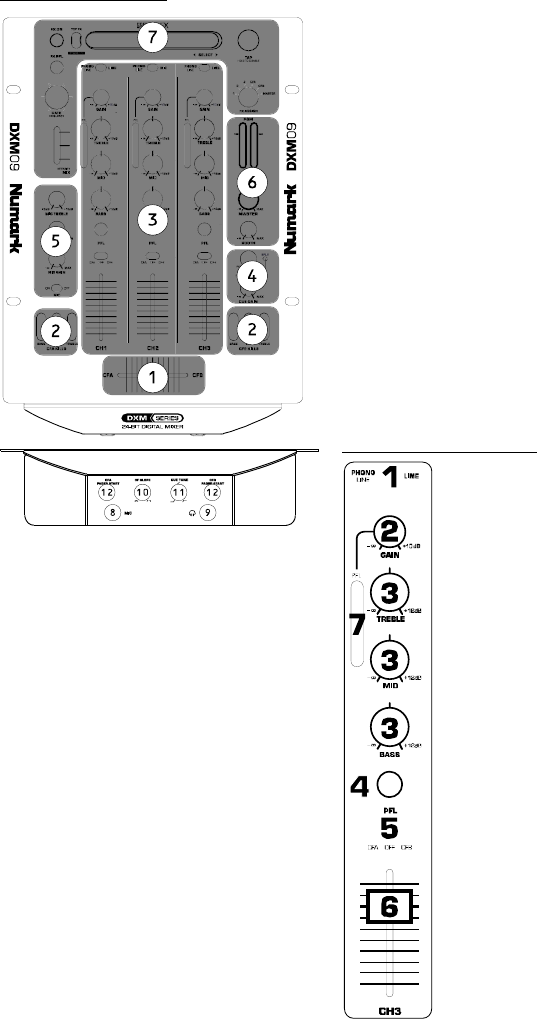
FRONT PANEL FEATURES
1. Crossfader: This replaceable crossfader
fades between channels assigned to CFA
and CFB. The fader can be replaced by a
Numark “D-Type” or “CP-Pro” fader. Call
Numark customer service for information.
2. EQ Kills: Eliminates High, Mid, or Low
frequencies for a unique effect. Each set of
three switches will only affect audio routed
through the crossfader.
3. 3 Audio Channels: The mixer contains
three audio channels which are described in
detail in the Audio Channel section in this
manual.
4. Headphone Monitoring: This section
contains the CUE GAIN knob to adjust the
headphone volume, and the CUE BLEND
knob to mix between the master and the
channels selected by the PFL buttons on
each channel. Pressing the CUE BLEND
button activates a split cue mode.
Push the knob to engage a split cuing mode
which sends all audio channels with the CUE
Assign button engaged to the left side of the
headphones and the MASTER output to the
right side of the headphones. This mode is
an excellent way to mix when booth
monitoring is not available.
5. Microphone Adjustments: The MIC GAIN
knob controls the level of the microphone
input on the front panel. There are also a
MIC BASS knob and a MIC TREBLE knob to
control the sound of the microphone input.
To turn the microphone on, move the MIC
switch to the ON position.
6. Output Levels: The master level output is
controlled by the MASTER knob. The booth
output level is controlled by the BOOTH
knob.
7. Beat Synced Effects: The mixer has a
highly customizable beat-synced effect
system which is described in further detail
in the Effects Section in this manual.
8. Microphone Input: This 1/4" input is for
the microphone controlled by the
Microphone Adjustments (#5).
9. Headphone Output: Connect your
headphones to this 1/4” output.
10. Crossfader Slope Adjustment: This knob
adjusts the slope of the crossfader from a
smooth fade (mixing) to a sharp cut
(scratching).
11. Cue Tone: This knob adjusts the tone of
the headphone output without affecting any
other output. This can be used to help mix
while in a loud environment.
12. Cross Fader Start: Both sides of the
crossfader have a FADER START switch
which can be used to trigger external
devices which have a fader start input.
AUDIO CHANNEL SELECTION
1. Input Selector: Selects the
desired input source.
2. GAIN Knob: Adjusts the
channel audio level pre-fader
and pre-EQ.
3. EQ Knobs: Adjusts the
treble, mid and bass
frequencies. The level of
each frequency can be set all
the way down to zero
(killed).
4. PFL Cue: Sends the pre-
fader level of the audio to
the cue section for
headphone monitoring.
5. Crossfader Assign: Routes
the audio in the channel to
one side of the crossfader.
The OFF position bypasses
the crossfader.
6. Channel Line Fader:
Controls the level of the
output signal post EQ into
the crossfader (if assigned)
or MASTER.
