5
To Properly Adjust Each Audio Channel:
1. Toggle the Input Selection Switch to the desired input source.
2. Press “PLAY” on your source audio device (CD Player, Turntable, MP3 Player, etc.)
3. Set all EQ Knobs to the 12 o’clock position.
4. Adjust the GAIN knob such that the audio level is reading around 0dB as shown in the PFL meter.
5. Move the Channel Line Fader to about 70% of maximum.
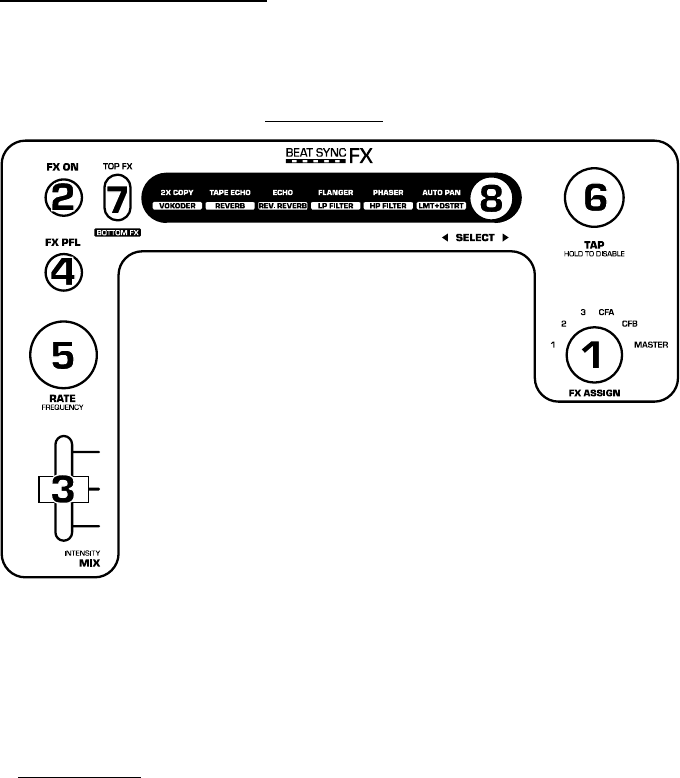
EFFECT DIAGRAM
1. FX ASSIGN: This knob selects the audio source to
modify with the effects processor. Channels 1, 2, and 3
can be independently selected. CFA and CFB represent
side A and B of the crossfader. Switching to master will
provide effects on the final mix before going to the
output. Note: to use the effects on a microphone only,
attach the microphone into MIC2 on Channel 2. Select
FX ASSIGN to Channel 2.
2. FX ON: This button turns the effects on.
3. INTENSITY MIX FADER: This fader controls the mix of
the effect. With this fader is down, no effect sound will
be audible through the assigned sound source (1). With
the fader all the way up, only the processed sound will
be sent to the assigned sound source (1).
4. FX PFL: This button sends the effect sound to the headphone cue regardless if
FX ON is turned on (2). To preview effects, set the FX ASSIGN (1) to the desired
channel, make sure that FX ON (2) is off (the light will not be on), and turn on
the FX PFL button (4). The button will illuminate indicating that the FX PFL is on.
Make sure that the headphone CUE BLEND is adjusted such that the PFL cue can
be heard. Adjust all of the settings for the effect. Turn on the FX ON button (2)
to activate the effect over the main outputs.
5. RATE FREQUENCY: This knob sets the rate of beat-synced effects.
6. TAP: In order to align the effects with the beat, tap the beat sync to the rhythm 3-4 times on the
beat. If it has trouble syncing, try again. The beat sync often works best when tapping to half the
tempo. For example, try tapping on just the snare drums (typically the “2” and “4” count). If the
beat tap loses sync slightly, you may not need to tap again because the FX will likely still maintain
sync. Otherwise, you can tap on beat once to re-sync.
When in beat sync, effects below denoted with an asterisk (*) will have rates or times which are related
to the tempo. Use the RATE/FREQUENCY knob to adjust the multiple of the tempo (1x,2x,4x, etc.).
To disable beat sync and have continuous control over the rate/time of an effect, simply press and hold
the beat sync button until it remains lit. Now the RATE/FREQUENCY knob will allow you to precisely
tune a rate or frequency. To re-enable beat sync, tap out the beat again.
7. Effect Shift: This switch selects between the top and bottom effect that is illuminated on the
display. For example, if “FLANGER AND LP FILTER” is illuminated with the effect shift switch to the
TOP FX position, FLANGER is selected. However if the BOTTOM FX position of the effect shift switch is
set, the LP FILTER is selected.
8. SELECT Switch: This flip switch is used to select effects. The effect selected will illuminate as the
flip switch is toggled. Use the Effect Switch (7) to determine if the top or bottom effect illuminated is
selected.


