


CARTRIDGE SETUP
For Head Shell Mounted Cartridges:
The cartridge that comes with this turntable should be preinstalled on the head shell. If it isn't, please
follow the below instructions for installing a cartridge onto the head shell.
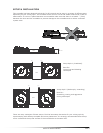
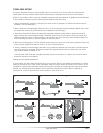
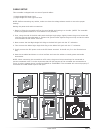
1. Position the head shell and the cartridge so that the four connector pins are visible. Make sure that the
stylus cover is installed to prevent damage to the stylus during installation.
2. Prepare to connect the cartridge to the head shell using the green, red, blue and white connector wires.
3. Starting with the upper left pin and going clockwise install the white, the red, the green and finally the
blue wires to the connector pins. Be careful not to bend the metal clips on the end of the wires. These
metal connectors should never make contact with one another.
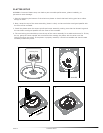
4. Using the screws and bolts that are included with the cartridge, loosely fasten the cartridge to the head
shell body.
5. Once temporarily fastened, position the cartridge so that both screws are aligned with the optimum
position mark on the Head shell (Numark HS 1 Head shell and Numark Cartridges only.) Moving the
both screws to a mark away from the optimum position indicated on the head shell may increase or
decrease performance depending on the cartridge used. For safe vinyl record treatment, the screws
should always be aligned perpendicular to the head shell (any angle may increase "record burn.")
6. Once the cartridge is positioned correctly, secure the cartridge to the head shell by tightening the
mounting screws.
For Integrated Head Shell Cartridges (Numark CS-1, CC-1, CX-1, etc.)
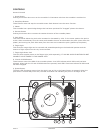
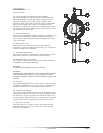
7. Align the pin on the rear of the Cartridge Assembly so that it is in a vertical position and insert it into
the tone arm lock nut.
8. Secure the cartridge to the tone arm by turning the tone arm lock nut clockwise until the head shell
feels secure and does not wobble to the left or right. WARNING: Over tightening the tone arm lock nut
may result in permanent damage to the tone arm or the cartridge.
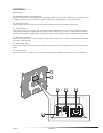
9. Remove the stylus protector before playback.
1. 2. 3. 4.
Cartridge
Headshell
Connector
Pins
Cartridge Headshell
W
R
G
B
White
Blue
Red
Green
DO NOT TIGHTEN!
5. 6. 7. 8.