


10
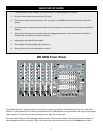
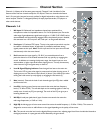
24. DDT™ Speaker Protection: Peavey’s award-winning speaker protection is built into the XR600G. This important
feature allows you to maximize the power amplifiers without fear of distortion.
25. Graphic EQ: These 9-band EQs are fixed on one-octave centers. They are designed for 12 dB of cut or boost. The
equalizers are placed before the Preamp outputs and therefore‚ the Main and monitor preamp outputs are post-EQ.
26. Monitor Level: This control sets the overall level of the monitor signal that is sent to the Monitor output jack. This
control also sets the monitor level going to the power amp when in Main/Mono mode.
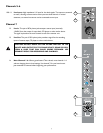
27. Power Amp Mode: This button is used to configure the XR600G power amps as either main/main or main/monitor. It is
recessed to prevent accidental switching. Use a non-metallic object to change the switch position (e.g.‚ a toothpick). The
unit is shipped from the factory in the default main/main setting. When the main/main switch is depressed‚ the first
power amp is assigned to the mains and the second amplifier is assigned to the monitor.
28. Main Level: This is the master level control for the main mix sent to the main output jack and corresponding
power amplifier(s). This also controls the main level going to the power amp when in the main/monitor mode.
29. Power Amp 2 In: Plugging into this jack allows a path directly to the power amplifier channel.
30. Power Amp 1 In: Plugging into this jack allows a path directly to the power amplifier channel.
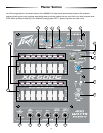
31. Main Output: This 1/4" jack provides a signal from the main system mix after the graphic EQ. This is used primarily to
feed an auxiliary amplifier/speaker system.
32. Monitor Output: This 1/4" jack provides a signal from the monitor mix‚ after the graphic EQ‚ for an external
amplifier/speaker system. The level is determined by the channel monitor and master monitor controls.
33. Effects Defeat: This 1/4" jack accepts an on/off 1/4" footswitch (Peavey Part # 00051000) to defeat effects of both the
Main and Monitor mixes.
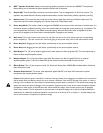
34. Phantom Power Switch: This switch‚ when depressed‚ applies 48 VDC to all input XLR connectors to power
microphones that require phantom power.
Caution: When phantom power is switched on‚ make sure that any channel you are plugging a microphone into is turned down
and the Master Main and Monitor controls are set to minimum. Otherwise‚ there will be a loud pop in the system. It is best to
first plug in all microphones into their respective channels before phantom power is switched on. This reduces noise through the
system and reduces the chance of damage to the microphones. If phantom power is used‚ do not connect unbalanced‚ dynamic
microphones or other devices to the XLR inputs that cannot handle this voltage. (Some wireless receivers may be damaged.
Consult their manuals.) The line input jacks are not connected to the phantom supply and are safe for all inputs (balanced or
unbalanced). An unbalanced to balanced impedance converter such as the Peavey 5116 or a Peavey 1:1 Interface Adapter may
also be used to isolate a microphone from phantom voltage.