


Playing Devices and Level Settings
Quick GuideQuick Guide
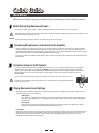
Quick Set-up
Before Connecting Devices and Power....
CAUTION
NOTE:
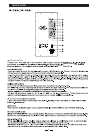
Connection Power to the PA System
4
We know you’re anxious to enjoy your portable PA system. The following instructions will get you started:
Turn all volume and gain levels, equalizer, to minimum. Set the MIC/LINE switch in for microphone use, or out for line-in use.
Before connecting any devices, make sure to turn off the power for all devices (including microphones). Also, before turning the power on or off,
set the volume levels on all devices to minimum.
For best results when connecting an instrument, use a direct box, preamp, or amp simulator.
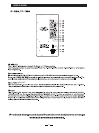
Connecting Microphones or Instruments to the Amplifier.
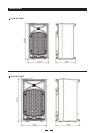
Connect the output from your signal dource (mixing console, microphone, preamp, or other Mic or line level source) directly to the INPUT
connector on the back of PA-12A/PA-15A. PA-12A & PA-15A use a combination of XLR and 1/4” TRS connector, accepting balanced or
unbalanced line-level signal from mixers, preamplifiers, CD palyers, tape decks, etc. with the MIC/LINE switch set out for LINE, and accepts
direct connections from dynamic microphones with the MIC/LINE switch set in for MIC.
P-12AUI & P-15AUI also have USB port for MP3 playback, iPod connection, and stereo RCA jacks specifically for stereo line-level input from
auxiliary devices.
Connect the supplied AC power cord to the AC receptacle on the back of P-12 or P-15 unit. Plug the male end into an ac outlet, properly
configured with the correct voltage for your application. WARNING P-12 and P-15 are designed to adapt for both American standard
voltage (110VAC-120VAC, 60Hz) and European Standard (220VAC-2470VAC, 50Hz). The fuse is designed to adapt to these standards,
but before plugging in P-12 or P-15 into an outlet, verify the voltage switch is set to the correct voltage. It is initally set for American
Stadndard voltage.
Turn on the signal source(s), verifying any master volume levels are at minimum. Then, turn on your P-12 or P-15.
To avoid and loud, unexpected noise from the speaker, first turn on the power to thouse connected devices that are
closest to the sound source.
Start the signal source, whether its speaking into a microphoine, playing an instrument, or starting an auxiliary source. Adjust any volume
controls of the signal source for normal operation.
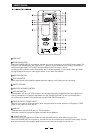
USB Playback
If you want to use a USB flash drive for playback, insert the flash drvie into the USB port and set the source selector switch to
MP3. When using a USB flash drive, use the playback controls for track selection. Track name and duration are displayed on
the LCD screen.
iPod Playback
If using an iPod, insert the iPod into the docking station and set the source selector switch to iPod. When using an iPod for
playback, use the controls of the iPod for track selection and playback control.
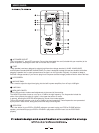
Level Settings
Slowly increase the gain controls for the input channels or on-board source until the desired level is achieved. If the volume level increases
rapidly, decrease the main volume level immediately. If output level is low, verify all gain levels and volume levels are set correctly. In the
event there is no sound, always reduce the main volume to minimum before investigating other sources. There may be a mixer or
preamplifier mute or delay that may activate suddenly.
CAUTION