


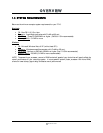

OPERATION
14 | PreSonus 2007
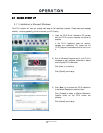
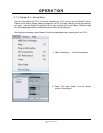
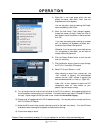
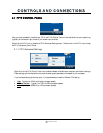
4) Right-click in the track space within the new
project and select ‘Add Audio Track’ from the
dropdown menu which appears.
You can also add a track by entering the
Project
menu and selecting ‘Add Track’.
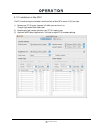
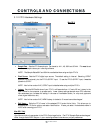
5) When the Add Audio Track dialogue appears,
choose the number of Audio Tracks you wish to
add, whether they will be Mono or Stereo and then
click ‘OK’.
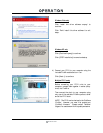
If you have two audio signals making up a stereo
pair (i.e. keyboard, FX processor, cd player, etc.),
you should use a Stereo Configuration.
Otherwise, if you have a single, mono audio source
(i.e. microphone or instrument), you will want to
choose a Mono Configuration.
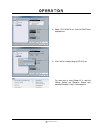
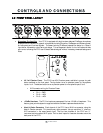
6) Click the Record Enable button to arm the new
track for recording.
7) Click the Monitor button to hear the input through
the FP10’s 1/2 and Main CR outputs.
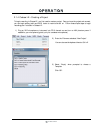
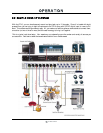
8) Select FP10 input ‘Stereo In > Left’.
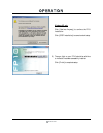
When choosing a mono from a stereo pair, the
“left” channel is typically the odd-numbered
channel, and the “right” channel is typically the
even-numbered channel (i.e. Left is 1; Right is 2).
Press <F4> on your keyboard to enter the VST
Connections menu for more details on your
specific input and output routing.
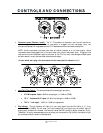
9) Turn up the gain control knob on the front panel of the FP10 for channel 1 while speaking/singing into
the microphone or while playing your instrument. You should see the input meter in Cubase LE react to
the input. Adjust the gain so the input level is near its maximum but without clipping.
10) Connect a set of headphones to the FP10 headphone output. You may also wish to connect monitors to
the FP10’s Main CR Outputs.
11) Adjust the MIX control knob counter clockwise to monitor the input zero latency. Turn the MIX knob
clockwise to hear the computer’s playback and software monitoring.
12) You are now ready to record.
Cubase LE help is available by pressing <F1> on your keyboard or online by visiting www.steinberg.net.